Wednesday, July 27, 2016

Use Print My Cal to Print a Google Calendar

My students like a paper calendar. I use Google calendar and our class calendar is embedded on my website and on my Schoology page.  Every year I threaten to stop printing the paper version, but the students always ask me to do it, so then I do. This creates a bit of a hassle because Google Calendar doesn't print nicely, so I end up typing all the information into a calendar twice - once for Google, once to print.

Yesterday I tried out Print My Cal. This service allows you to print a Google calendar with some limited format choices. In the very easy process, you sign in to Google and make a couple choices for your formatting. Then choose the calendar (or calendars) you want to print and download the file to print. 

I have tried out a couple of different fonts and I haven't found exactly the right thing yet, but I think with this one


I am on the right track. It's very plain and the formatting isn't perfect, but if it means I can stop typing the calendar twice, I am happy to keep poking around to find the right mix of font and size to make it great! Thanks Print My Cal for this tool!

Привет Россия


This week something exciting happened on A Lever and a Place to Stand! During this past week, my blog has had more pageviews from readers in Russia than in the US. This week marks the first time that any country other than the US has been the top of the pageviews list. Welcome, Russia!

I can't tell by looking at the analytics which post brought this increased international traffic, but I am so intrigued. If you are a Russian chemistry teacher or a Russian teacher of young children and you might consider partnering with me on a project this year, let me know by commenting below. I would love to connect with an international classroom!

Striking Coding Gold with GoldieBlox

Another new coding app entered the scene recently. This one is another app brought to us by GoldieBlox. If you aren't familiar with GoldieBlox, this is a line of toys worth checking out. Founder Debbie Sterling is an engineer who cashed in everything she had to start this line to encourage girls to make and build and engineer things. When she was just getting GoldieBlox off the ground, every time I watched her talk about the company, I teared up. This subject hits home with me, so we own many GoldieBlox sets and the Movie Machine app. Needless to say, I was very excited about the idea of a GoldieBlox app that teaches coding.

Open the app and you have four options: play the coding adventures, go to the coding sandbox, play the mini-games, or watch Goldie videos. I went directly for the Goldie adventures. The premise of the game is goofy - someone is having a birthday but we don't know who so let's deliver cupcakes to everyone we know in town to cover all the bases.  I recently checked out the game Nancy Drew Codes and Clues and the story is stronger in that one; it makes more sense. Still, the goofy nature of this fits this brand and the target demographic, girls ages 6 - 8, will love the idea of delivering cupcakes. The animation is adorable. Kids will be instantly engaged by the cute characters and the fun of the game.


The game is a good mix of back story dialogue, a nice progression of levels, some mini-games and some dress-up components to break up the coding levels. The coding levels start simple - tap direction arrows to move Goldie and her rocket-powered skateboard. Single arrows eventually give way to more challenging arrangements, requiring mutli-step planning. As levels are mastered, players can pick out trophy items for Goldie and Ruby to wear - scarves, sunglasses, and so on. There are also mini-games where players rearrange pipes to squirt icing onto cupcakes or tap falling ingredients (and avoid non-ingredients) to make cupcakes.


After I fiddled around with the coding levels, I checked out the Sandbox. In the Sandbox, you can choose many of the parameters - size of grid, number of obstacles and turns - and a puzzle is generated that meets those specifications. You can name the levels and save them. I liked this feature a lot. Even after all the levels are mastered - and there are a lot of levels - there will still be a lot of fun left in this game in the Sandbox.

I'm sure there is a reason that the same is designed for kids ages 6 - 8. Maybe that is the optimal age for planting a computer science seed with kids. Or maybe it's the demographic that buys the most GoldieBlox toys. Or maybe the difficulty of the levels is designed for kids who think at that level. This app is sure to be a hit with those kids, but I think it will also appeal to older kids. It's a great introduction to coding embedded in a story with cute characters and engaging animation. A win, all-around!

Special thanks to the friends at GoldieBlox who supplied me with the app so I could check it out!

Tuesday, July 19, 2016

My Favorite Yes: The Answer Pad

During an inservice this past year, I was introduced to a strategy called My Favorite No. We watched this video


about the strategy and I really liked it (video AND strategy!). If you don't have time to watch the video right now, here is the gist: Give kids a quick bellwork assignment to complete on an index card. Collect and quickly sort into right and wrong answers. Then choose the best wrong answer and use a document camera to project it to the class. Ask the students to identify everything that is done well in the incorrect response. Then ask them to suggest a correction and identify why the teacher chose it as her favorite "no."

I like how quick it is, how it emphasizes that everyone makes mistakes sometimes, how the class starts with what is good and corrects the mistake. I like that everyone gets better at editing his or her own work. Today I stumbled upon a way to do with without index cards or document cameras.

One of my favorite web tools (and apps) is The Answer Pad. I use it most often as a student response system in interactive mode. I was demonstrating this tool today and showed an airplane icon that allows you to broadcast one student's work to every student's device.

What I didn't realize is that when the image is broadcast, every student has the chance to edit the student's work. If you look at my images from above, you might notice that Joe's work is incorrect. If I chose that as my favorite no," I could broadcast it to everyone and ask for verbal information about what is done well. Then ask everyone - not just the student or two I call on - to correct it. Maybe I would get something like this:
That's awesome! I love that it's as fast and easy as index cards without the stack of index cards in the trash at the end of each class. This is one I will definitely start to incorporate more next year!

Saturday, July 16, 2016

On Using Scientific Notation


This week I have been reading with great interest a discussion in a chemistry teachers' Google Group. It started with a post about whether or not teachers find it acceptable when students give answers as 3.6e-4 instead of 3.6 x 10⁻⁴. There were a couple of back and forth ideas about whether or not this is acceptable practice on its face value:


Then the conversation shifted away from that and to a more important idea: does writing an answer as 3.6e-4 tell a teacher something about a student's understanding of the math and/or the chemistry?


This is where I was really drawn in. In my experience, students arrive to chemistry in tenth or eleventh grade with little understanding of scientific notation despite its inclusion in the 8th grade standards of the Common Core (emphasis mine):

CCSS.MATH.CONTENT.8.EE.A.4
Perform operations with numbers expressed in scientific notation, including problems where both decimal and scientific notation are used. Use scientific notation and choose units of appropriate size for measurements of very large or very small quantities (e.g., use millimeters per year for seafloor spreading). Interpret scientific notation that has been generated by technology.

When we begin the mole, we have to use scientific notation because the numbers of atoms in a small sample of matter will be so large. Until then, has there really been a point in their mathematical education where they really needed scientific notation? I argue that even though it is probably taught in middle school math, it isn't really needed and, after that initial treatment, it also isn't revisited or practiced. Am I wrong? Why teach it in 8th grade if students don't need it?

What I observe when I teach this is that a lot of students want to use, and persist against my advice, to use the buttons for "x 10^" instead of EE, but shouldn't we expect that? They see 3.6 x 10⁻⁴ and that looks like the operations they have been putting into a calculator for many years, so they do what they know. Maybe what is missing is a conversation about when that will work (when they multiply) and when it will not (when they divide without parentheses) because that gets at mathematical understanding too. Eventually, most students become adept at punching the designated buttons into their calculator, but in March and April when we have been using it for months, I still have students who ask what they did wrong to get 0.00036 when I give an answer as 3.6 x 10⁻⁴, so I know the understanding isn't there.

Chemistry creates the headache that requires scientific notation to be the aspirin. Too often, though, perhaps my focus has been on getting us over the math hurdles so that we can be successful on the chemical ones. This same Google Group debates the merits of significant figures about once a year. Every year by May I make the same threat: Next year I am not teaching the sig fig rules. Instead I will require students to write down every digit they see in their calculator. After a few days of that torture, when they start begging to have some rounding rules and then I unpack the sig fig rules. Would it work? Is there something there that could help with scientific notation?

In short, how can I simultaneously help students be successful in chemistry and better understand math? Do you have ideas? I am all ears. Please comment!

Related aside: There are two iOS apps that I like for helping students see the magnitude of the powers of ten: TickBait's Universe and Universal Zoom. While they won't necessarily help students understand what a number in scientific notation represents, I love the conceptual way they represent it.

Related aside #2: Funny that it's called scientific notation, right? Not mathematical . . .

Wednesday, July 13, 2016

Even More to Flip For

I have written twice before about how much I love the templates at flippity.net. In fact, the first blog post I ever wrote was about the cool flashcards you can make from a Google Sheet when you grab the template at flippity.net. Then last July I wrote again about how more templates have been added. Well, here it is July, so it must be time to write about the other great tools that are available.

The template I am most excited about is the Random Name Picker. Though it sounds like it only does that, it actually is a random team maker too. You can choose from one name, a lineup of all names, or teams of up to 12 kids, or up to 12 teams. With a click of a button, they can be instantly scrambled.


There is also a spelling list maker and a mad lib generator. Click on a student's name and you can see, practice, and test on spelling words. With the mad lib generator, you see a list like the one pictured and you fill in words. Then, presto! A mad lib!

Another great template is the badge tracker. This creates a display of available badges. Then click a student's name and you can see which badges have been earned.

All of these work in the same general way. Grab the Google Sheet template from flippity.net. Delete the demo information and replace it with the names or questions you want to use. Publish it to the web (with a couple of clicks). Copy the link Google provides and paste it into a box. That's all there is to it!

With the addition of mad libs, spelling words, badge tracking, and team makers, there are now 8 available templates. The flashcards and quiz show remain my favorites, but this family of spreadsheet tools just keeps getting bigger and better.

Tuesday, July 12, 2016

Need a Great Graphic: Try a Stencil

The best part about leading PD is finding great new tools and ideas by sharing with other people. During the past two days I have taught a Google class at a local college. When introducing Chrome, I talked about extensions and then we all sifted through some extensions to find some that we might like. One that I found was Stencil.

Stencil allows you to "create images faster and easier than ever before." I will have to agree with that claim because I created the image above in about 4 minutes. Given 5 minutes, I might have been able to match the reds better! 

The process couldn't be easier. Select a background. There are almost 700,000 to choose from. Type some text. Or select a ready-made quote. Drag it to where you want it to be. Resize, change color - all with easy, intuitive clicks. Save the image, download it, share it on social media. Easy, easy, easy.

The free account allows you to save 10 images every month. You have a selection of backgrounds and icons to use instead of the whole library, but it appears to be a generous supply of the royalty-free, attribution-unnecessary Creative Commons images. For $9 a month, you get more stuff. For me, I think the free plan will do just fine.

In a world where images are taking over, it's great to find a tool where you can make beautiful ones quickly. Stencil reports that visual content is 40X more likely to be shared on social media than content without visuals and that tweets with images get 89% more likes than tweets without.  Need an image or a quote (or both) for a blog post? You can have one in minutes. This is definitely an extension worth checking out!

Monday, July 11, 2016

5 Quick Google Forms Tutorial Videos

I'm going to let you in on a secret. I sort of hate what happened this year to Google Forms. Until this week, I have tucked my head in the sand and ignored the new Forms. I have persisted with the old Forms because 1) there is more functionality and 2) the menus and processes are more consistent with the other main Google apps. 

This week I am teaching a graduate workshop on Google apps, so I felt compelled to embrace the new Forms. I took an old assignment and tried to fix it as a new Form. That was a colossal failure because of some things you can't do, like rearrange sections. Still, I wanted to show the new Forms, so I rebuilt the assignment. As part of that process, I made 5 videos that quickly (< 2 min each) show an aspect of new Forms. Because my last post - on creating auto-graded quizzes without add-ons in Google Forms - has been a popular one, I decided to share the videos here.


Make a Form and Add to a Folder


Choose a Theme for your Form


Add Questions to Google Forms


Practice Taking your Own Google Form Quiz


Look at Google Form Responses


The assignment I created is a Google Form to help people learn to create a Google Form. If you'd like to take a look at it, you can check it out here. The videos are in the assignment as help stations. This assignment makes use of sections (pages, in old Forms) and one of my favorite features, "go to section based on answer." I hope you like it!

Friday, July 8, 2016

Testing out the NEW Google Forms

It's never been easier to create a quiz using Google Forms. Now you can give a multiple choice quiz that is auto-scored without an add-on like Flubaroo or Super Quiz. Here is a step-by-step guide:

When you create a new form, look for the gear icon in the upper right hand corner. Click it. This opens the settings for the Form. There are three tabs - General, Presentation, and Quiz. Click Quiz and you will see this:


Click the switch to "make this a quiz" and then select any of the other options that you want. Make sure to look at the choices in the other tabs (General and Presentation) too so you can collect usernames if you want or restrict students to one response (one chance at the quiz) or allow many responses.

Click the plus sign to add questions. In order to have the questions operate as a quiz, you will need to choose one of the objective question types - multiple choice, checkboxes, or dropdown. These are the only ones that will allow you to mark an answer for the key.

Click on the words ANSWER KEY to select the correct answer for the key. When you do this, you will also have the chance to ADD ANSWER FEEDBACK that students will see after they select their answer. The feedback can be text or a link they can explore.

When students take the quiz, they will see the typical message after submission (this message is customizable, by the way) with a new addition: View your score. Click this to see how you did on the quiz.


After clicking View your score, students will see a score in purple in the upper right and each question, color-coded red or green for right or wrong. They will also see the correct answers.

Teachers can see the results, individually or for the group, by clicking the word RESPONSES near the top of the Form in edit mode. When you click RESPONSES, you can also click the green spreadsheet icon to create a spreadsheet of the responses.

If you are looking for a quick way to deliver a multiple choice quiz and get it auto-graded, this is pretty simple. If you want a little more flexibility - greater variety in question types, multiple correct answers - you may still want to check out Flubaroo or Super Quiz.

Thursday, July 7, 2016

Finding My Way with Stoichiometry

Last month I read a post, "Your GPS is Making You Dumber," by Dan Meyer with great interest. In it, Dan explores the dichotomy of providing steps for students to use in solving math problems vs. providing the problem without the steps to let students grapple with how to solve it. If you haven't read it, the post and the 40+ comments are a great read. I highly recommend it.

I mention it here because this year I tried something different when I taught stoichiometry, the mathematical relationships inherent in chemistry. I blogged about my new approach here and here. To summarize, instead of showing my students exactly how to solve stoichiometry problems, I presented the problems and suggested they figure it out. I helped and prodded and eventually showed several different systems. This post is the end of the story.

At the end of the year, my students take an end of course exam. It's a fourteen question test over the big ideas in chemistry, written and graded by me, to assess how much growth they have made over the course of a year and amounts to 10% of their grade in the course for the year. I guess that qualifies it as high stakes. Or at least high stakes-ish. There is, of course, a stoichiometry problem where students are given the mass of a reactant and asked to calculate the mass of a product. This is a chemistry standard, something I would want every student to be able to correctly do by the end of the class.

In the 2014-2015 school year, I showed my students discrete steps for solving stoichiometry problems. We return to these problems every month of the year, so by April when they take the end of course exam, they have seen the process many times. In that year, 87% of my students solved the stoichiometry problem correctly. The other 13% didn't leave it blank or earn 0 points; they made a mistake or two but earned partial credit.

In the 2015-2016 school year, I did not provide the discrete steps. I focused instead on helping students get there in their own way. Again, we revisited the concept many times throughout the year and on the formative assessments, my results were typical with other years. On the end of course exam, though, only 62% of my students correctly solved the problem. Again, the other 38% didn't leave it blank or earn 0 points, but often they left out the step that uses the balanced equation, the part that shows they have connected the problem to the reaction that is taking place.

A drop of 25% has spooked me about trying this again next year. On the other hand, perhaps comparing what I did for 24 years with what I tried in one year isn't a fair comparison. If I could compare my first year's results with this year's results, would they be this different? There is no way of knowing because I don't have those results.

I am a believer in inquiry or discovery or constructivism or whatever the word is to describe that when students build meaning, it leads to better understanding. Looking at my data, though, I am wondering if it was my question or my method or something else that caused this big drop in results. 

In his post, Meyer writes: 

Similarly, our step-by-step instructions do an excellent job transporting students efficiently from a question to its answer, but a poor job helping them acquire the domain knowledge to understand the deep structure in a problem set and adapt old methods to new questions. 

My stoichiometry question certainly measured whether or not they could solve a routine question in chemistry. Maybe if I had asked a different kind of question, one that measures their understanding of "the deep structure in a problem," then I might have different results? What do you think? Please add your thoughts as comments. I would love to hear them!

Wednesday, July 6, 2016

Planning for Next Year with TeacherCal & EddyCal


This is a post that I have been kicking around for almost a year, but I saw an announcement this week that moved it to the top of my Drafts pile. More on that in just a minute.

Last August I signed up and tried out TeacherCal by EduSync. TeacherCal is a teacher planning calendar that syncs with Google Calendar and Google Classroom. Once you are signed up or signed in, you can create terms of instruction and add courses to the terms. Then click on dates on the calendar to create assignments. All the assignments auto-post on the Google Calendar that you designate. If you click on an assignment, you see something like this:


Notice the Google Classroom icon if you want to add the assignment to your Classroom too. You can attach a link or a file from Drive or somewhere else or create a new doc, sheet, form, or slide from the assignment with the click of an icon.

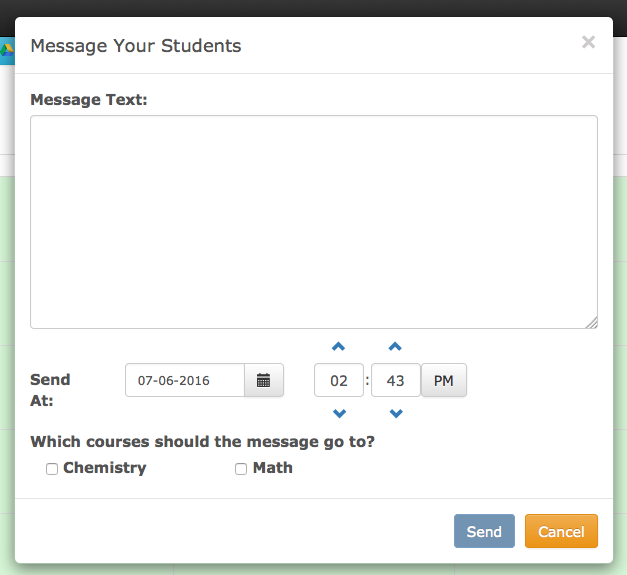
I also really like that you can click a button and message all the students in a class. When you do, you get a window like this


and you can type a quick message or reminder, choose when it gets sent, and who should receive it. Easy! 

There is also a FREE student planner called EddyCal. Students log in with a Google account and type in a course's join code:

Students get this great, tiled view of what courses they are in, what assignments are upcoming, and any communications from the teacher.


I love how clean and organized it looks! As assignments are completed, click the done icon and they disappear. There are some sorting options as seen in the pictures above. Click on an assignment and you get the pop-out view below that shows the details. Notice this one has a link attached.


When I was describing everything I like about this to my sister, she asked, "Why not just use Google Classroom. Why do we need this tool?" I can think of a few reasons. First, a teacher is going to plan, so why not plan on the Calendar that syncs to the one we use at school anyway? Also, some assignments - like ungraded homework or a reminder to study for a quiz - are silly to create in Google Classroom because there is nothing to turn in, but they make perfect sense here. Parents, too, could use the join codes to keep tabs on what is due in which class to support student work at home. With Google Classroom, that is possible but challenging. As a mom, I get aggravated when I can't see the parameters of an assignment because I can't log in to my children's Google Classrooms.


So what brought the post to the top of the Drafts pile?

After August 1, TeacherCal will become TeacherCal Pro and will no longer be free. However, any teacher who signs up BEFORE AUGUST 1 will be able to use the tool for free forever. Since the student tool is already free, signing up in the next month makes great sense. I wish I could convince all my children's teachers to sign up this month! Just in case I can't, I hope you might sign up and convince someone you work with to do the same!


Tuesday, July 5, 2016

Coding Camp Recap


Last week a colleague and I had a great time hosting our district's first ever coding camp for rising fourth, fifth, and sixth graders. Until we attended a free workshop by code.org, we had a long list of resources and ideas. After the code.org workshop, we decided to lean heavily on their amazing tools and also use little programmable robots called Ozobots. We structured each 4 hour day around a concept and word of the day. Here is what we did each day:


Day 1: Algorithm

We started with some unplugged activities by code.org - Paper Airplane Algorithms and Graph Paper Programming. Both of these help students practice the idea of algorithms and sequences. Starting with these allowed us to quickly see who followed directions instinctively and who needed help. After the unplugged stuff, we got everyone logged in to accounts we created for them at code.org and we started online activities as part of Course 2. We finished the day with about an hour of drawing mazes for the Ozobot's to color track. Kids loved that the robots followed colored lines and that they could use colored switches to change the robot's motion.


Day 2: Loop

We started with an unplugged introduction called Getting Loopy. Students learn a dance that has repeating motions [Shout out to Kristen Landers who I heard speak two week's ago: She told me that Kidz Bop streams at slacker.com so you get music kids will sing and dance too but you don't have to worry about language]. Then we worked on loops at code.org. We took a break from computer work with another unplugged activity called Binary Bracelets. Kids spell out their first and last initial in white and black beads and string them onto elastic cord. We used white beads that change color in sunlight; that was a fun surprise when we went outside for snack. We finished the day with using drag and drop block coding to code the Ozobots.


Day 3: Debugging

The first activity was unplugged - a relay race where kids had to program as a team and sometimes debug each other's work. Then we worked on debugging modules on code.org. We gave the kids a lot of time on Day 3 to create a design for their tshirts. They used the Artist modules to create whatever they wanted. As they struggled to make their designs, they had to do much debugging to get exactly what they wanted. This day was the big payoff because we envisioned them making a quick design and calling it quits, but it was just the opposite. They worked so hard to write code to create letters and beautiful patterns. They asked to skip snack! We returned to Ozobots at the end of the day. Kids created mazes on cafeteria trays for the Ozobots to run the next day.


Day 4: Conditionals

To show what conditionals are, we played some card games with rules they invented. Then the kids worked on the conditionals modules. While they worked, we ironed their tshirt designs onto their tshirts so they could all wear their art work during the coding exposition we had during our last 30 minutes. Then we worked on Ozobot mazes. Then we prepared for our Expo. The parents came back for the last 30 minutes of camp to see the kids collect their Course 2 certificates and demonstrate their new skills.


A few takeaways:


Code.org is a spectacular resource with so much more than games for the Hour of Code. With four courses to work through, curricula for using computer science to teach math, and science, and, of course, computer science, and a new app lab, it is a vast, generous resource. Teachers can create classes, monitor progress, inspire students.

We loved watching the kids help each other, especially during their free creation time. They would ask each other how to do something and sometimes just hover behind someone, quietly observing another student's process. Kids felt so proud to help each other. We mostly walked around and cheered them on; we certainly did little instruction.

Left to their own creation devices, the kids far surpassed anything we could have imagined they would create when we made our agenda for the week. It was great fun to be in that environment and watch them develop an idea and carry it off.