 One of the things I am working on this school year is visual thinking - making my ideas more visible and asking my students to do the same. To that end, as a teacher, I will continue to focus on drawing tasks with my students and, as a learner, I am exploring sketchnoting. I blogged about that here.
The app that I am using for sketchnoting is Paper by Fifty Three. Paper is a sketching app with a recommended bluetooth stylus that allows for more functionality than a typical stylus. It is pretty easy to get started with Paper. And though I thought my first sketchnotes were pretty clunky, I got a lot of compliments on them when I shared them.

Those first sketchnotes were a bit of a struggle. The empty white canvas is threatening to me. I feel like I need a plan before I start and sometimes halfway in, I want to scrap the whole thing and start over. As I got started, I kept wishing that there was a way to import some images that I could compliment with drawing and text. Of course, it turns out that there is!
I recently learned that this is possible. In the app, there is a little camera icon in every sketch. Tap it and you access your camera (take a quick snapshot!) or your cameral roll (import a picture). After you have a picture, you can resize it or spotlight a portion of it. I used the spotlight feature to highlight only the colored flames in the image above. I love that this spotlight feature focuses attention on just the colored flame which is why I chose the image. Then I drew in boxes for answers and added a little text to create the image above that I could use to check for understanding after the flame test lab. Pretty cool, right?
This is such an easy way to create a professional looking image that is customizable. Just one more reason to love this powerful app!
 Last week I had a lot of good luck with new webtools. First I tried Quizalize and that was great. I also tried LearnClick (more on that at some point) and it was pretty good too. Then I finally got to WordWall's beta web version of their interactive whiteboard software. It was fantastic!
I first learned about WordWall on Danny Nicholson's excellent blog. I have had the tab open in several browsers for months. I wanted to use an activity created in SMART Notebook, but it wasn't working well with my new Epson projector, so I needed a substitute. It was a perfect time to try out the beta WordWall.
WordWall wants to keep teachers using "large touch screens" to "to create activities that are a pleasure to teach with, and fun to participate in." The WordWall concept is to create templates for teachers to use to create interactive activities. These templates are designed by graphic artists and are easy to use so teachers can focus on content and not on design. They have desktop software and, in fact, offer a free personal license to teachers, but now there is also a web-based version that is in beta. This is what I tried last week.
There are 34 templates in the beta version of WordWall. Some are teaching tools (seating chart, brainstorming) and some are games (whack-a-mole, group sort) and some are quizzish (true or false, quiz). Click on the template, type in your content, click done. It's that easy. You make an activity public or private and you can always come back and edit it later. Here is the activity I made. Students sort properties of ionic and molecular compounds.

To play, just share the weblink. The activity I made has a pleasant sound if you sort correctly and a sad noise when the property is in the wrong place. When all the tiles are placed correctly, they dance and there is a jingly sound effect. This is designed to be a whole group activity, but I am going to use it as a station in a station rotation I am doing on molecular compounds. I love the sound effects because students will get feedback about whether their answers are right or wrong independently, allowing me to concentrate on helping at a different station.
As promised, the activity does look great and you can change the look with the click of a button. It is also easy to change from one game type to another. I got a little stuck when trying to play (user error!), so I sent an email to the contact address. I got a helpful response very quickly - always a plus (Thanks, Dan!). There are some math tools available for equations and subscripts/superscripts. You can also search other user's games by education level and subject area, so you might find a ready-made tool just waiting for you. All in all, this is a great webtool and will definitely become one of my go-to tools! I highly recommend you getwordwall this week! If you want try out the beta, click here and use the code danbeta. Thanks WordWall for sharing that code with us!
One of my most popular posts is this one, a comparison of Kahoot!, Socrative, and Quizizz, three great formative assessment tools. Each of them has a quizzing feature with some gaming elements that make learning fast-paced and fun. This week I tried Quizalize, another formative assessment tool that will give them some competition with some of their best features plus some extras.
I learned of Quizalize when they followed me on Twitter (thanks, Quizalize, btw!). Intrigued, I headed to the site to check it out. It was very easy to make a new quiz. Click the + New Quiz button and you're on your way. Add multiple choice questions with a few features -- a range in timing from 5 to 60 seconds, images, math mode (for math symbols and equations), and an explanation of why the correct answer is correct. I used the math mode so I could insert superscripts. I did have to read their excellent guide on how to make that work, but I felt like I learned something in the process.

After I created the quiz, I created my classes. Each class gets a code. When students play, they type in their names and the code and they get funneled into your class without creating an account. I love that! Then you can assign the quiz to the class and leave it open. This is one of the features I like the best. I created the quiz and assigned it on Monday, but my students didn't know anything about it or use it until Tuesday. This makes Quizalize great for a station in a rotation that might span a couple of days or as a homework assignment. With a click of some buttons, you can assign and unassign quizzes.
Now the fun part. The quiz assigns more points for right answers that are selected fast. Students earn a score that they see after every question.
There did not appear to be a leaderboard for students to see, but the teacher can see everyone's scores as the quiz is happening and at the end. As the students play, the teacher can see a bar showing their progress, color-coded to indicate how well it's going (blue is great, red is bad). I removed the names for these screenshots, but they are displayed in the tool.
When the quiz is over, students can review their answers, correct answers and how long it took them to answer.
Teachers can see the kind of data you would expect, but in some very cool formats. First, a graphic shows how many students participated and, based on the student shading, how well they did (of the 17 that "played" in one of my classes, one is rated as needing help and 6 were just ok).
Teachers can look at individual questions to see which were hardest and easiest and what answers were selected. Click on a student and the teacher can see the student's strengths and areas of need. This is awesome and really sets this tool apart from some of the others. The data analysis available on Quizalize (visualize student progress with quizzes?) is excellent.
A few other things are noteworthy features of Quizalize. First, quizzes can be easily shared and made public. In addition, there is a marketplace where teachers can search for (and sometimes buy) quizzes to use with their classes. Teachers can, as far as I can tell, actually set their price and sell their quizzes (an aside: let's just share our stuff for free). I shared my first quiz with a colleague so he could use it too. When he tried, there was a problem, but a quick live chat with the Quizalize wizards had it working by his next class. That's fantastic.
I tried three new tools this week and this one was my favorite. If you are looking for a fun tool for formative assessment that is easy to use and gives you great data on your students' progress, watch this video on Quizalize and then head over there to get started.
This week a reader commented on this post about my use of my iPad to lecture in my classroom. He asked what apps I was using to project to the class. Below is a picture of a handout I used to suggest some options to my colleagues:
Of all the options on the page, IPEVO Whiteboard is the one I have used the most. It has just the right amount of great features combined with intuitive simplicity to make it easy to use. Yesterday I wrote about using iPad Keynote as a remote control for laptop Keynote. DeMobo Slides does pretty much the same thing with Google Slides and Prezi. If you have a laptop or iPad and a projector, one of the above apps will probably meet your needs.
Today, while prepping an activity for Monday with a colleague, we accidentally discovered awesome. He was using the iPad to tap through slides in a Keynote I made and he tapped too long on one slide. From the bottom of the screen popped up some hidden tools - 7 colored markers and a laser pointer tool. I know this isn't like discovering Teflon - and maybe everyone knows about this but me - but I was still pretty excited to find these hidden treasures. Once the tools pop up, you can select a color and write on the screen to highlight an idea or draw something onto an image. Tap the laser pointer and you can drag it around to emphasize or draw attention to something.
I have written this year about using my iPad as part of my classroom routine for giving notes. I have been using an app called IPEVO Whiteboard for this. It has just the right amount of bells and whistles for me, including the ability to import images and record the screen while talking and writing. Yesterday I presented an iPad PD session and some of my colleagues asked for an easy way to draw on a slide. A screenshot and IPEVO Whiteboard is pretty easy, but if you already have a Keynote (or a PowerPoint you turn into a Keynote), these hidden tools are even easier.
So tonight I opened Keynote on my MacBook to see if these tools are available in the desktop version of Keynote. They're not. At least not exactly. What I learned tonight (thanks Keynote Help!) is that you can use your iPad or iPhone as a remote to control a presentation on your laptop or desktop Keynotes. When you use your iPad (or iPhone) as a remote, then you can use the highlight and laser pointer tools on your iPad and they will write on the slides on your desktop version.
It was very easy to set up my iPad to control my laptop version of Keynote. On the iPad in Keynote, I went to the Presentations screen and tapped the iPad icon. Then I tapped continue. Then I went into Keynote on the laptop and opened Preferences. I clicked on the Remote tab, clicked Enable, and selected my iPad. Then I could see a giant green play button on the iPad. When I clicked it, it started my presentation.
I'm not really a prepared slides kind of a teacher. I typically like to start with a blank canvas, but if I have a lot of images to share and annotate, I would definitely use this. Finding it today felt like discovering buried treasure!
In my most recent post, I mentioned the Straight A Fund Grant that my school received to renovate 60+ classrooms, our media center and lecture halls, and build a professional development center. Our grant evaluators spent a few days at the school this month. They attended a faculty meeting to touch base with our staff about how the blended learning initiative was progressing. They summarized for us what they had learned about our students' hopes for the pilot in meetings with the students. Students expressed a desire for:
- increased availability of Information
- greater Interest in content
- deeper Interaction with teachers and content
These three points struck a chord with me. They aren't new ideas, but they are important ones. As this year gets off the ground, my colleagues and I are trying a lot of new things to use our available technology as much as possible. It is helpful, though, to have a litmus test to use for determining whether or not a use of technology will benefit teaching and learning. Perhaps these three ideas - information, interest, and interaction - can serve as the litmus test.
- Will this use of technology bring students in contact with more or better information?
- Will this use of technology establish more interest in the content?
- Will this use of technology allow students and teachers to interact in a deeper way?
In the same way that the SAMR model encourages us to think about how technology complements or extends a lesson, these questions focus attention on whether or not technology enhances or distracts in a lesson. An internet search could bring better information or it could provide so much information that it's easy to avoid a task. A technology-based assessment could provide real-time data that informs instruction or it could be machine-graded with little impact on instruction at all. I like the simplicity of these three ideas as a lens for examining best practices. If the use of technology won't accomplish at least one of these things, I am going to try something else.
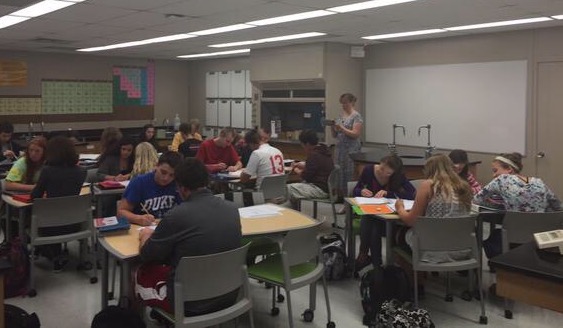 The school where I teach won a large grant last year to move ahead a vision of blended learning. The result has been a 1:1 program in the high school with 60+ redecorated classrooms, a new media center, and renovated lecture halls. The science rooms were limited a bit because we have a lot of specialized lab furniture that couldn't be changed. Still, our student desks - the classic desk attached to chair - were going away and we had to choose a new style of student seating. My room is especially crowded and I worried about adding a lot of tables to a space that already contained 7 lab tables and a teacher demonstration desk. In the end I chose tables where three trapezoidish tables form a wonky shield table. Six weeks in, I love them!
 So far, I have used the tables in three arrangements. For everyday use - notes, group work, some stations work - I am using the trapezoidy tables in pairs. They create strange rectangle workspaces that are big enough for four students. When I need a bigger space for bigger group activities or larger station work, I move three smaller tables to form the wonky shield. Sometimes I need the students to be independent - test and quiz day - and then I split all the tables apart and seat the students at those 12 tables and the lab tables.
I will admit that I spent a fair amount of time mocking the idea of flexible furniture last year. Of all the things I could augment or innovate in my classroom, I would not have bet that furniture would have made a difference. Like so many things I have tried in the last 5 years, I am eating my words this year. Now I am spending a fair amount of time moving furniture, but each time I do it, it goes a little faster. Plus, it's all on wheels so it is easy to rearrange to new configurations.
I am surprised at how much I like teaching students at tables. The biggest difference I notice is that the students interact much more when they spend every day facing each other in these groupings. This has meant that I need to be moving around a lot more; I don't really feel like I can stand at the board when I give notes anymore. I typically now stand right in the middle of the classroom and lecture off my iPad. On that side of the teacher desk, I notice more things about my students, like who is playing with their split ends instead of attempting chemistry and who is hungry for the next math problem. My students already worked in groups a bunch, but almost always at the lab tables. These new tables make their group work possible in and out of the lab space and reinforce my priority on teams. The students do rely on each other more, asking questions of each other as they work. Last week when I was checking homework, one lab group was working so hard to help one member with his homework questions. The level of intervention they were providing never would have happened when the desks were in rows.
 One of the things I am working on this school year is visual thinking - making my ideas more visible and asking my students to do the same. To that end, as a teacher, I will continue to focus on drawing tasks with my students and, as a learner, I am exploring sketchnoting. I blogged about that here.


