My students write lab reports about once a month. They do labs a lot more often than that, but we save the formal write-ups for about once in each unit. Often these are inquiry labs where students have designed their own procedures and carried them out in order to determine something. Since each group might have a slightly different take on the experiment, the lab report helps me get a better picture of what direction they went and where they ended up.
In the past, I have accepted handwritten and typed reports, on my template or on whatever is handy. This does present some challenges, not the least of which is that some of them are sloppy and hard to grade. I decided at the end of last year that I was going to use Google Docs for lab reports this year -- everyone has to type them. Plus, I will use Doctopus and Goobric to farm out the assignment and give students feedback. This means I need a better rubric. My past "rubric" has been pretty pathetic:
5 = meets or exceeds the criteria for this section
4 = is missing a component, but almost meets the criteria
And so on . . .
There are usually 4 or 5 sections in the report, so I grade each one out of 5 (the maximum score on the rubric) and then add up the scores. I labor over the grading -- the combination of reading the reports and agonizing between a 4 and a 3. Most students do pretty well on these, but they still grumble when it's lab report time.
I was already thinking about the rubric when I attended an Ohio Regional Network Leader Summer Leadership Academy last week in Columbus. The ELA group had a lucky visit with a PARCC assessor who shared some strategies for helping students maximize success on the PARCC tests this year. One of the tips was to use the PARCC rubric. All the time. Teachers have to know it, kids have to know it. So, I figured, maybe I should know it.
I looked at the PARCC Extended Scoring Rubric for Narrative and Analytic Writing. Needless to say, it was much better than "5 = meets or exceeds the criteria for this section." I like the way it broke up the task of writing into smaller components and the descriptive language it uses to help students differentiate between levels on the rubric. I decided to try to adapt the PARCC rubric for lab reports this year. Here is what I have landed on so far:
I tried to choose PARCC statements about content, organization, and mechanics since those are the things I would prioritize in these written reports. I sometimes eliminated some words from the PARCC descriptors because they did not apply here. I tried to keep my rubric to one page.
From my side of the desk, it looks like these reports will be easier to grade because they will all be typed, the rubric focuses my grading, and Doctopus and Goobric will deliver the work and provide the feedback. Maybe I'll even try out Kaizena for voice comments. I may still wince at the electronic stack in my Drive and the students may grumble at the chore of the report, but I hope I have created an assignment that makes more sense and provides them with meaningful practice for the assessments next spring.
Four summers ago I was on a crazy quest to move on the salary schedule, so I signed up for 15 graduate hours at Fresno Pacific University. If you have never taken their independent study professional development classes (and you're a self-starter who is willing to go it semi-alone), I heartily recommend them. Anyway, one of them was about using Web2.0 tools in the classroom and the textbook was Will Richardson's very excellent Blogs, Wikis, Podcasts, and Other Powerful Webtools for Classrooms. I remember thinking at the time, "Why would anyone write a blog?" And also "Why would anyone want to follow someone else's blog?" Lucky for me, the answer came fast in that class and in that book.
I started following blogs in that class using the now defunct Google Reader. I started with just a few that looked interesting (see my What I'm Reading list over there on the right). Fast forward four years later, I am following over 50 blogs with Feedly and finding amazing things in them all the time. Just tonight I learned about Chikungunya fever (ok, that one is not cool and now on my summer paranoia list), why Americans stink at math, and that Jessica Biel will guest star on one of my favorite shows this season (guilty pleasure!). But the highlight of the evening was that I learned how to make a 20 second animated GIF on the TechSmith blog!
If you're not familiar with TechSmith, it's time to get to know them. They are the creators of many screencasting and video editing tools that teachers love. I found their blog when I used their free Jing to create my first screencast during that Web2.0 class. Jing is the perky little sister of the beautiful and talented Camtasia. Cousin Snagit is another screen capture and video creation tool. Tonight I installed the Snagit App and Extension for Chrome. I used them to make this GIF on a chromebook. Can you name those phase changes?
It was easy to do. Really. Go read the excellent directions on the TechSmith blog. While you're there, start following their blogs. They'll deliver them right to your email. And then make a GIF of your own.
One of my favorite apps to showcase in professional development workshops is the whiteboard app ShowMe. The free app is very simple and intuitive to use. Touch the record button, speak and/or write and draw on the whiteboard and then touch the record button again. The tools are not elaborate -- different colored pens, eraser, the ability to insert images -- but they are still powerful. The finished products get stored at Showme.com where they are searchable (if you want them to be) and likeable. You can follow users to find and share their ShowMes. Teachers can create classes and see all their students' Show Mes. Teachers can easily use ShowMe to create flipped lessons, but students can also use it to demonstrate their understanding of a topic or create something unique that can be shared with the world. When I am facilitating iPad PD, I ask teachers to create short intros using ShowMe. It's a fun way to get started and often teachers share that they like the idea enough that they plan to try it in their own classrooms.
On Sunday ShowMe released a great update that allows users to create ShowMes with different backgrounds. A great app just got better! When you tap the insert image button, you see 4 options now, including Choose a background:
When you touch Choose a background, you see the options for backgrounds:
The free options are the whiteboard, a grey background, a green background (I love this one because it looks like my chalkboard), and a black background (blackboard!). For $0.99 you can buy some other background packs -- a lined paper pack, a graph/grid pack, a coordinate plane pack, and a dots grid pack. I immediately bought the lined paper pack and the graph/grid pack because these will come in very handy for teaching science.
I can see where some people might be disappointed that these backgrounds have created an in-app purchase in what was once a totally free app, but I like this as an option. Instead of charging for the simple features, everyone still gets the app for free. For people who don't need these new backgrounds, they still get the beautiful simplicity of ShowMe without extra cost. For those of us that need the lined paper or the graph, paying $0.99 seems like a great bargain to get these very usable backgrounds. Here's a look at a quick ShowMe I made tonight with the new graph background. Thanks, ShowMe, for the terrific update!
My eight year old daughter complained this week that we haven't done anything fun all summer. Ouch! There has been plenty of summer camp and staying up late and fireworks and ice cream, but we haven't gone away and I knew that's what she meant. So I asked, "Where would you go for some summer fun?" and I could have predicted her answer: "Pittsburgh!"
As a lifelong Clevelander, having a daughter who seeks fun
in Pittsburgh is probably some kind of sinful, but my kids love a quick
day trip or overnight to our sister city and we do it a couple of times
a year. One of the biggest draws of the city for them, and the reason
my daughter wanted to go, is the Children's Museum. At 10 and 8, my
kids have outgrown Cleveland's Children's Museum. When they were
younger, we had a membership and went regularly, but their target
audience is a little younger. The Children's Museum of Pittsburgh,
though, offers a lot for kids of all ages.
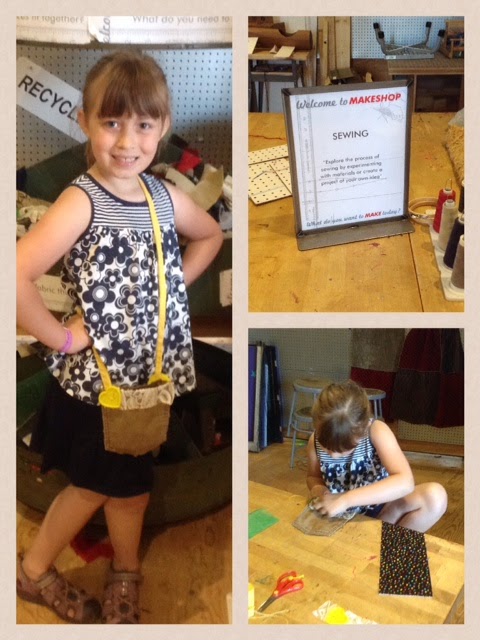 One of the areas we like the best at the Children's Museum of Pittsburgh is the first floor MakerStudio. This is where my daughter wanted to start the day. In the MakerStudio, you can practice sewing and sew projects of your own design, create cardboard scenery for a stop motion movie, create circuits out of various elements, create a ball run from lots of assorted hardware, play with virtual characters that you arrange electronically, and more. My daughter poked through a fabric carousel to choose several interesting scraps and an old corduroy pocket that she used to create a crossbody handbag. She loved that she could design it exactly the way she wanted it and construct it right there.

My son used his MakerStudio time to create a couple stop motion movies. One project involved placing squares on a grid board while a camera took pictures of it. The other is the puppet theatre -- kids can create set pieces from cardboard and then use an iPad to film their movies. He was very excited to share his finished projects. Some kids were so proud of their movies that they were asking museum workers to email the videos to their parents. My son moved next to the ball run area where he created a ball drop out of tubes. He asked me to film that one so he could document his work.
Before we left, we spent some time in the art studio where my daughter used ink and watercolors to make a cool cat picture in a technique inspired by illustrator Quentin
Blake. Then she painted and created a screen print with newspaper and paint. If we had more
time, she would have started several other projects. We had to tear her away to go on to museum #2.
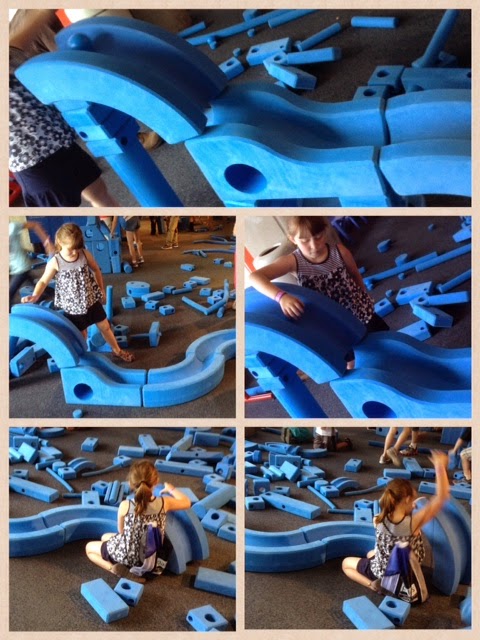 Our second stop in Pittsburgh was at the Carnegie Science Center. As
you walk in, there is an exhibit titled "Blue" that has a lot to offer in
terms of making potential. We played there for quite some time,
building a ball run out of interesting blue foam blocks of many sizes
and shapes. Other kids built towers and buildings, body armor, and more.
As I look at the pictures, I am struck by the simplicity of these materials. Sure, there were some specially cut foam blocks and an iPad and a camera, but mostly it was cardboard and fabric scraps and paint and imagination. My kids loved the whole day - the part that was the standard museum exhibits and especially the part where they did their own creating using materials supplied.
Our second stop in Pittsburgh was at the Carnegie Science Center. As
you walk in, there is an exhibit titled "Blue" that has a lot to offer in
terms of making potential. We played there for quite some time,
building a ball run out of interesting blue foam blocks of many sizes
and shapes. Other kids built towers and buildings, body armor, and more.
As I look at the pictures, I am struck by the simplicity of these materials. Sure, there were some specially cut foam blocks and an iPad and a camera, but mostly it was cardboard and fabric scraps and paint and imagination. My kids loved the whole day - the part that was the standard museum exhibits and especially the part where they did their own creating using materials supplied.
So much is being written every day on the subject of making. Or maybe it's Making. Schools are adopting MakerSpaces. Libraries are offering Maker Nights. In January the Cleveland Public Library opened Tech Central,
a very high tech MakerSpace that offers cardholders the opportunity to
try 3D printing, laser and vinyl fabrication, and video/audio/music
production. Even the White House hosted a Maker Faire.
It's great to see museums offering possibilities for making too. Lots of museums brag about their interactive exhibits, but sometimes interactive means you just get to push a button. These exhibits offered so much more. I hope to see other museums, parks, and other family spaces get into the act as well. Maybe even businesses. Hey, Joann and Michael's, how about a Maker night or afternoon in your stores? No agenda, just materials and a helping hand. And I need to think about how to do more making in my chemistry classes this year. Maybe it will be making things to demonstrate chemistry knowledge or maybe it will be using chemistry to make something, but my plan is to Make it happen.
Book Creator is one of those apps that everyone loves. Whenever I showcase it with teachers or students, everyone always starts dreaming about all the books they will write with this easy to use app. Today, when I checked for app updates, I saw something very exciting -- Book Creator had an update that allows the user to export the book to video! Excellent new option for this amazing workhorse of an app!
In a hurry to check it out, I tried it with the tutorial. With the book selected, I tapped the export/share symbol. Here is what I saw:
Then I selected "Export as video" and saw this screen:
I saved the video to my camera roll. And then uploaded it to YouTube. And here is the video that the app created:
I love the idea of turning kids' books into YouTube videos that could be shared with family and friends - or an even wider audience - as videos. This creates a lot of possibilities for making tutorials or flipping lessons too -- build the lesson or tutorial in Book Creator and export as a video.
This is super exciting for me because augmented reality is high on my school year to-do list this year. With the possibility of exporting a book creator book to the camera roll, this means the video could be placed as a virtual layer onto a still image with the app Aurasma. Create a book about anything and let it come alive with the video export and a trigger image. I can't wait to try this in the fall!
Last week I taught a professional development workshop On Google Apps for educators. I had read about Flippity Flashcards on Free Technology for Teachers and was anxious to give them a try. Flippity flashcards use a Google Sheet template that is easy to change, so that's what we used as our spreadsheet project. And flippity.net has a great FAQs page if you want to include pictures or images in your flashcards. How cool is that?!
Want to give it a try? Go to flippity.net and grab the template. Once you have it, it is very easy to delete the data in the cells in column A and B (but don't eliminate the words Side 1 and Side 2). Type in your new data. Words and definitions? Pictures and words? The possibilities are endless.
After you have finished your cards, Go to the File Menu and drag down to Publish to the Web. Read through your choices on the pop-up window and decide if you want to check boxes or not. It might be a good idea to check “automatically republish when changes are made” so that if you add data, new cards will be added to the deck.
Click on Start Publishing. Near the bottom of that pop-up window is a box that you need to copy and paste into a box on the spreadsheet.
Once you do, you will get a link to go to your cards. Try them out!
Once your flashcards are ready, there is a nice set of options. You can do them in the order you made them or in a random order. You can quiz yourself off side 1 or side2. In addition to flashcards, you can also make quizzes from your flashcard decks. That is a great self-check feature!
At the end of the workshop, several people indicated that these flashcards are definitely something they hope to use next year. I am going to use them too. Here are the element name and symbol flashcards that I made. Now that they're made, they are easy to share by providing the link to my students. Flippity flashcards will make learning these names and symbols F-U-N (fluorine-uranium-nitrogen).
I can't
say for sure why I remember this story. I can't tell you what the
speakers said at any of my graduations, or any graduation I have ever
attended. As a teacher and competitive speech coach, I have heard a lot
of speeches and most of them didn't stick. This one did, though, and I
never get tired of thinking about it.
I was being inducted into the leadership honor society Omicron Delta
Kappa while in college. The speaker was one of my favorite college
professors and she launched into a tale about ancient Greek thinker
Archimedes. Everyone knows the one where he ran naked through the town
screaming "Eureka," but this was not that tale. In this one, a ship
needs to be launched off the shore and every man in Syracuse comes to
push, but the boat won't budge. Along comes Archimedes, premier science
dork of his day, with another statement now famously attributed to
him: "Give me a lever long enough and a fulcrum on which to place it,
and I shall move the world." Of course, no one believed him, so he
rigged up the lever and the fulcrum and launched the ship to prove his
point.
Dr. Rea went on to talk about how the story was relevant to our
honor society induction. Here we were, the campus leaders, being
recognized for accomplishments and she indicated that it was time to
start thinking about the way we would lead. What were our levers?
Where would we stand? How could we change the world? I remember
feeling simultaneously inspired to run out and change the world and also
in awe of what a tremendous speaker she was.
I can't say for sure why I remember this story. Maybe it was the
science? Maybe it was her delivery? Maybe it was my admiration for her
as a teacher and role model? Whatever it was, I think about the story a
lot, especially when I have a big obstacle to move or a project to
launch. When faced with a challenge, we have to find the lever and the
place to stand. I am going to record my attempts here.


