Tuesday, December 12, 2017

Argument-Driven Inquiry

I spent a terrific day today learning about Argument-Driven Inquiry (ADI). This topic has been on my to-learn list for a while, so I was anxious to participate. It was a great hands-on day and while I don't feel like an expert, I am looking for a time when I can implement this technique in my classroom. Here's my rundown.

Argument-driven inquiry is an instructional model for science teachers to use with labs. Through an 8-stage process, students develop an argument and then read, write, speak, and listen their way to supporting it. In the workshop today we tried each of the stages. They include:


Stage 1: Identification of the Task & Guiding Question

Introduce the idea or concept and the guiding question for the task. At the workshop today, we were asked to consider how we could use a lever maximize the jump height of a figure.


Stage 2: Design a Method & Collect Data

Using a planning form, students develop a testable hypothesis and experiments. Then the experiments are conducted. My group investigated the effect of mass of a dropped object, distance of the figure from the fulcrum, and mass of the figure.

Stage 3: Analyze Data & Develop a Tentative Argument

Use a whiteboard to record the guiding question, the claim, the evidence (including a graph of data), and a justification. 

Stage 4: Argumentation Session

Using a round robin style, some members of the group stay with the board and present the ideas while others visit other groups and hear their ideas. There are "back pocket cards" that can be used to help students ask good questions as they listen to their peers.

Stage 5: Explicit & Reflective Discussion

A full class discussion gives students the opportunity to reflect on what they saw at all the whiteboard stations and link ideas from the experiment to what they are learning or have learned in class. Content could be explored in depth here.

Stage 6: Write an Investigation Report

The investigation report focuses on 3 questions: 

  • What question were you trying to answer and why?
  • What did you do to answer your question and why?
  • What is your argument?

The report is 1-3 paragraphs long and could be written in about 25 minutes.

Stage 7: Double-Blind Group Peer Review

Students use a feedback form to work as group to provide feedback to anonymous papers. The feedback form has very targeted questions to focus students on helping peers to successfully defend and explain their ideas.

Stage 8: Revise & Submit Report

Students use the feedback from stage 7 to make changes and submit a final copy to the teacher for evaluation.

ADI is a research-based instructional model that gives opportunity to practice science content standards, nature of science standards, and literacy standards. Lab manuals are available to help teachers get started. The website includes resources for using this model in your classroom - materials for instruction, to scaffold, and assess. There is also an online course that takes about 6 hours to complete and is a good introduction. 

This is definitely a model I want to explore more and try to implement in my classroom during second semester. Stay tuned for more posts about my attempts.

Monday, December 4, 2017

Quizizz: Fast, Fun, Free, Fresh

It's no secret that I am a big fan of Quizizz. In fact, I have blogged about this awesome formative assessment tool seven times, the last time almost exactly a year ago. My most popular post is a comparison of Quizizz, Kahoot, and Socrative. In October and November each year I ask my students to memorize some chemistry content. I begin each class with Quizizz to try to encourage them to work on chunks of this content little by little. 

My students always seem to enjoy playing this quiz game. They quickly become accustomed to going wight to join.quizizz.com at the beginning of each period. Our results weren't terrific as we neared the test this year, so I used Quizizz to create one last game as an optional homework assignment. I didn't even say too much about it in class. I told the students it would be there if they wanted to use it to prepare. I provided the link and PIN on our LMS. It's worth mentioning that I also provided a link to a Quizlet deck and a couple of other web tools.

I checked the data from this optional homework assignment recently and was quite surprised by what I found. Despite the fact that it was optional, and that I said very little about it class, the game was played 42 times! Several students played it multiple times. One student did it nine times! When students are willing to use an optional tool, especially multiple times, that is a testament to its engagement.

Quizizz is almost ready to debut a new look to their tool. Currently users can opt in to the new interface but the old one will go away soon. The new one boasts many advantages, including better navigation, easier searches, and improved reports. Google Classroom integration has been around for a while, but now when you create a Quizizz and assign through Google Classroom, the data will show up in Quizizz AND in Classroom. Nice!

Quizizz is also having a #NameYourAvatar contest right now on Twitter. Name one of the recently redesigned avis and you could win a gift card! 

New interface, Twitter contest, high engagement - whatever your reason, this terrific tool is worth a look today!

Tuesday, November 28, 2017

Hooray! Free Premium EquatIO for Teachers!

Earlier this fall, I wrote this post about EquatIO, a Chrome extension that makes it easy to put mathematical symbols or equations into Google (and other) apps. EquatIO was built to take the place of the Google add-on g(Math) that has recently retired. 

There are free and premium versions of EquatIO. Today, texthelp announced free premium subscriptions of EquatIO for teachers! In short, with the premium version, teacher get free access to integration in Google drawings, forms, sheets, and slides; math and chemistry formula prediction, unlimited handwriting recognition. Plus, as new features, like the recent addition of the interactive MathSpace, become available, teachers will have free access to those, too.

In order to take advantage of this tremendous offer, install EquatIO. Then fill out this form to request free teacher premium subscription. Be sure to use the same email address to install the extension and to request free access.

Thanks, texthelp, for your commitment to giving all teachers access to great tools!

Monday, November 6, 2017

What's It Worth To You?

I was sitting in my study hall duty with a friend and we were both grading papers. He was muttering as he worked about how it would be impossible for him to make the class any easier. Intrigued by this, I asked him to elaborate. He explained that his tests were worth 40% of the students' grades and that if they just paid close attention to the study guide when preparing, they were sure to pass the test. I knew his comments were about the study guide and the test, but I was curious about the other 60% of the grade, so I asked. The other 60% was a notebook check. Upon further probing, I learned that this meant that students needed to have all the papers from the class in a notebook, maybe in a particular order. I remember asking him, "if you keep all the completed papers in the correct order in the notebook, you could just opt out of the tests and still pass the class?" His response: I have never really thought about it like that.

At the school where I teach, we have just wrapped up first quarter and parent-teacher conferences. In an effort to help students improve their performance in my class, I ask them to do a bit of reflective thinking: How did I perform in each area of the class? In which area could I improve? How will I accomplish that improvement? Likewise, I am doing some reflective thinking about my practice, especially in the area of grades.

I classify my assignments in chemistry as tests (40% of the total grade), labs (25% of the grade), quizzes (25% of the grade) and a miscellaneous category (10%). During first quarter, I evaluated 25 assignments for 620 points - 2 tests, 17 labs and quizzes, and 6 miscellaneous assignments. A pie chart of assignments in my class might look like this:

I have deliberately structured these assignments and categories so that tests are a big deal, but they aren't everything. Labs and quizzes together are worth more than tests and there are many more of them. Students encounter and practice a concept about five times before they are tested on it; they receive formal and informal feedback several times leading up to the test so that they can have a keen idea about their progress.


Lately I have become aware that my system isn't the norm. In both of these examples with computer-weighted categories, 80% of the grade in the class is based on two assignments; 20% of the grade is based on several smaller assignments that often appear to be graded on completion. In both of these systems, if the computer-weighted categories were removed and a grade was recalculated using only the points each assignment was worth, the grade could change a great deal.


I have a lot of questions about these grading structures:

  • Why is so much of grade dependent on so few assignments?
  • How do students know how well they understand a concept if they are not formally evaluated between the birth and test of a concept?
  • Is it realistic to think that most students will accurately self-evaluate their progress during a unit of study based on completion assignments?
  • Does this type of structure generate concerns about homework that isn't helpful or test corrections and retakes?
  • Are there other types of assignments that could be used to measure progress? Is the continuum only high stakes tests for 80% of a grade or completion activities?
It seems a commonplace perception that education has become too focused on standardized tests. Why, then, would teachers choose to emphasize [non-standardized!] tests so much over other types of assignments within their classrooms?

Much has been written about the ways schools assign grades and whether or not grades accurately represent what students know and are able to do. In my building we overhauled our grading policy about about ten years ago, partly in response to the book "A Repair Kit for Grading: 15 Fixes for Broken Grades." Taking many of the author's suggestions into account doesn't answer my questions about grading schemes that magnify one or two assignments.

In my teacher preparation, no time was spent discussing how many points assignments should be worth, how many assignments make a valid measure of student progress, or how to appropriately weight measures to reflect student progress. That's definitely a discussion that I hope will be ongoing. 

How do you organize and weight your assignments? Is it working? Please comment and join in the discussion.

Saturday, October 28, 2017

Atomic Models? I Can Storyboard That!

Sometimes people ask me what do I do to entice reluctant adopters to try something with technology in their classrooms. My answer is based on my own experience: start by remaking the worst lesson. Some technology integration is likely to make the worst lesson less awful. A little success will breed enthusiasm and a willingness to try again.

For a long time, my own worst lesson was a lesson about the atomic models. I had a video I showed with excellent content, but the trouble with the video was that it was a video of a filmstrip. Literally, it was a moving picture where the pictures did not move. I used it for years, justifying this by saying that the great content outweighed the disengaging still images. When I first started using iPads in my classroom, this was the first lesson I remade. I asked my students to read about the models for homework. The next day they made comic strips to illustrate atomic history.

I have used the iPads for this for years, but now that my school is a 1:1 school, I decided to try a new tool. I have always really liked Storyboard That, so I decided to try it out this year. Storyboard That has a free and premium version of the tool. The free version allows users to create a three-cell or six-cell comic with an incredible array of customizable scenes and characters. The premium gives more options for cells. The best part of the premium plan is that you can pay for a month at a time (instead of paying for a year at a time), so you can buy it just for the month you need it. They offer a 14-day free trial, too, so you can try before you buy. I used that for this lesson.

My students found the tool easy to use. They worked most of one class period on their storyboards but they could finish for homework if needed. This was a definite advantage over using a set of iPads on a cart. They did a great job with the comics, so I printed them in color. One student said "I'm going to frame this" when I returned them! Based on that comment and these samples, you can see that students thought the assignment was fun and they were proud of their creations.


It's very easy to create and manage an assignment on Storyboard That. The interface is quite intuitive. I created generic logins for each lab group and asked them to work collaboratively in one account per group. This worked pretty well; I'll do it this way again in the future.

Storyboard That also has teacher guides and resources galore. If you need ideas for how you would use this tool, you don't have to go any further than this page. In fact, if you want to try the lesson I described above, you can find a teacher guide I created here. There aren't nearly as many guides for STEM subjects, but there are a zillion ELA resources for all ages and many history guides as well.

Sunday, October 8, 2017

EDpuzzle or PlayPosit: Which Should I Use?

Some of my post popular posts have been those in which I compare two or three similar tools to help others decide which one to use. My conclusion is almost always the same: all tools offer a great variety of features and which one someone chooses ultimately is probably determined by which feature is most important.

I have been using both EDpuzzle and PlayPosit (fka EduCanon) for several years. My school purchased a school license for PlayPosit this year and I have been developing some professional development materials for our staff. This renewed work in PlayPosit has catalyzed one of these comparison posts.

If you have never used either tool, EDpuzzle and PlayPosit are both tools that allow users to embed interactive components into videos. In both tools, students will be faced with questions that they must answer in order to continue with the video. Videos can be watched individually or as a class. Teachers can create classes and assign videos. Then they can monitor student progress as students respond to questions.

Below is a chart where I compare the two tools:


If you are interested in specific features I did not showcase here, check out the EDpuzzle FAQs here or the PlayPosit FAQs here

Ordinarily, my conclusion is that the compared tools are both great and should be chosen based on what features are desired. With EDpuzzle and PlayPosit, I am going to take a slightly different position. If you are looking for a free tool, EDpuzzle is the way to go. It has a slight advantage in that you can send students to a weblink from inside a video as part of their standard free package. They also offer apps for iOS, Android, and Chrome. If you have a little extra to spend, though, PlayPosit offers so many bells and whistles to the $144/year Master Teacher package that you will easily get your money's worth if you use a lot of videos.

Monday, October 2, 2017

Keep your eye on EquatIO

I've had a post on the Chrome extension EquatIO in my drafts queue all summer long. I saw something exciting about EquatIO last week, so I moved the post up to the top of the list. EquatIO began its life as a Google docs add-on called g(math). TextHelp, maker of the popular Read & Write for Google, have given g(math), created by John McGowan, new life and possibilities as a Chrome extension.

The EquatIO Chrome extension creates an easy way for users to insert math problems, symbols, and more into Google docs, slides, sheets, forms, and drawings. Users can input math via text, handwriting, LaTex coding, or spoken word, making it a versatile solution for everyone. There is a free version (integrates with Docs only) and a premium version (integrates with all the others too). There are some extra-special awesome features like predictive generation of symbols and formulas for chemistry, but only in the premium version.

In order to use the Chrome extension, you must be signed in to Chrome, even if you are just using the free version. Once you have it installed, click the icon in your toolbar and a pop-up window at the bottom of your browser window lets you start creating math. All of this is nifty, but not as exciting as what I tried last week.

It seems that TextHelp has big plans for EquatIO. Last week I tried a digital interactive use of this cool tool called MathSpace. I started at equatio.texthelp.com and built a math problem like this:

Then I clicked the blue share button in the upper righthand corner and got this:

Teachers (or students, parents, etc) can select to share with individual copies or individual copies and expected responses. Then click Continue to get a shareable link to email or post on social media or Google Classroom.

Students click on the link to see a copy of the math that was shared. They can create an answer and send it back to the teacher. EquatIO is a Chrome extension that is also a student response system! Below is one of the answers I received back when I tried it [N.B. Sometimes the people you can count on to play math in the afternoon do not actually want to do math.].

                             
I was impressed at how easy this was to share (2 steps!) and retrieve. I was also impressed at all the tools you can use to create math. My science teaching colleagues will appreciate the list of items you can add to the canvas - cars, pulleys, people, levers, gears, shapes, and more. It's a great list of unique items that you don't find on many other tools.


As if I wasn't already excited enough about EquatIO, I saw this tweet after I tried the interactive features:
Very excited to see TextHelp partnering with Desmos so that their calculator tool will end up in the EquatIO MathSpace. As I said above, keep your eye on this tool as TextHelp quickly adds more functionality to make EquatIO indispensable. 

Tuesday, September 12, 2017

Classkick + Manipulatives = Winning

I've written about Classkick for practicing skills, fostering collaboration, and differentiating instruction. If you haven't tried Classkick, here are the basics: You create assignment slides and students work on them. You can see work, and offer feedback, in real time. Students can also offer anonymous assistance to each other. Classkick offers an iOS app and also a browser-based tool. No matter which way I use it, I always love it! Last week, I tried it in a new way, to support work with manipulatives. True to form, Classkick exceeded my expectations again.

I wanted to create an assignment where I could monitor student progress as they built models atoms and molecules with little velcro balls called Bunchems. I started by uploading a PDF to Classkick. The PDF was made of images from slides I created to help students understand the differences between elements, compounds, and mixtures on a particle level. Between content slides, I created assignment slides where students would have to build something and take a picture of it with the iPad. Then upload the image for feedback. In the images below, you can see the "Good work" sticker that tells a student that she completed the task correctly and, in the second, my green helping text that seeks to redirect.


With Classkick, I could easily respond to each student as s/he built a model. The feedback inspired conversations at tables where students worked together. "How did you represent this one?" "Why is that better than what I did?" "Is there another way we could build this?" The conversations were even better than the activity itself.

As always, I love how I can look at the whole class view pictured below. All of the work is captured and saved, so I can return to this assignment to study misconceptions and create my next instructional steps. 


I loved how all the work they did was recorded. With manipulatives, once you take them apart and move on to the task, the work is gone. With Classkick, students can return to this assignment and study the pictures or revisit their ideas. 

Whether or not you use manipulatives and models, I recommend Classkick for your short list of apps to try this school year. With so many great options, it will likely fit whatever lessons you can think of. As kids draw, write, and insert images, they will work collaboratively and you save all the data. You can grade assignments within the tool, too. With so many good features, Classkick always feels like a win.

Thursday, July 27, 2017

Host Remote Meetings with FreeConferenceCall

I had a great experience this week with FreeConferenceCall. I had assembled a committee of people from all over Ohio and we needed to meet to finalize a recommendation. Rather than try to get to one location, we used FreeConferenceCall to meet digitally. It was so easy. I downloaded the desktop app and clicked the video button to begin the meeting. I could invite people by email or share a link. As people joined the meeting, they showed up on the right of the screen. If they used a webcam, we could all see up to five video feeds. If they called in, they had a white placeholder screen with their name or phone number.

I had considered a couple of other similar services, but what swayed me toward this one was that many people could participate at once. I only needed space for 12 participants (2 more than Google Hangouts allows), but FreeConferenceCalll allows for 1000 participants! That was just one of many things I liked. Here are some of the others:

  • When someone is talking, they automatically move to the center of the screen. Other participants' video feeds (or placeholders for audio callers) move to the right.
  • Screen sharing is so easy with the click of a button. Screen sharing also includes a drawing tool and the ability to switch presenters.
  • The entire thing can be recorded for people who were unable to participate.
  • The very simple dashboard includes common icons that make using the tool easy.
  • The chat feature allows users to send responses to all participants or to certain ones. This feature was great for one of my participants who we couldn't hear.
  • When the meeting is over, data is available about how long it lasted, how many people participated, and so on.
  • It's free.

If you need a free way to connect with people and conduct a meeting or bridge classrooms or collaborate with faraway colleagues, FreeConferenceCall is one I would recommend. Check out their list of features here and the FAQs here.

Saturday, July 15, 2017

A Stroke of Genius [Hour]

Dalton created a chicken nugget game controller.
Kids bitsboxing during Genius Hour.
In my last post I mentioned the inclusion of a Genius Hour into coding camp. The addition of an extra day this year created some found time in our camp structure. With a plethora of new coding apps and tools coming out all the time, we decided to allow for free exploration of a variety of these tools at the end of camp each day.

Our daily routine at coding camp includes completed the unplugged and computer-based activities provided by code.org. We also schedule time to work with ozobots. When we finished those projects, we set up centers around our room where students could choose coding activities to further explore. Our coding centers included:


As high school teachers managing upper elementary students, we really weren't sure what to expect when we first provided this time. We worried that students would not be able to focus for find enough to do for the full time we allotted. To say we were pleasantly surprised is an understatement. Each day they worked diligently. Some stayed in one place for the entire time, while others moved around, but they rarely had to be reminded of expectations during this time. They couldn't wait to get to Genius Hour every day. In fact, one student said she wished every hour of school was a Genius Hour. Several campers said their favorite thing about camp was something they learned during Genius Hour. Not convinced? Watch this video where Katie describes what she learned through Scratch.

My only previous experience this sort of loosely structured activity or assignment was in a professional development class that I teach about Google at Lake Erie College. After a typical class here, the participants write lesson plans or reflection papers about how to incorporate the tools we explored. In an effort to include Google's "20 time," I encouraged class members to propose a project, focused on a Google tool, and begin it during class instead of the typical lessons or paper. I just finished teaching this class for the fifth time and almost everyone chose the project option this time. Some created school calendars to share with colleagues and schedule events, some set up Google Classrooms or blogs for the coming year, and others leveraged Google tools in ways they hadn't before this class. Regardless of the project, people were grateful for the time to work on something that was meaningful to them. Just like the kids at coding camp.

As summer begins to wind down and my attention turns to returning to my own classroom, I need to think about how I can incorporate Genius Hour in my classroom. Any chemistry teachers doing this? I'd love it if you'd share your ideas.

Wednesday, July 5, 2017

When Coding is Your Jam

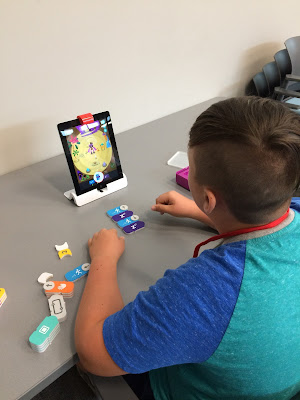
Last week I co-hosted our second annual Coding Camp for students entering fourth, fifth, and sixth grades. This year our camp expanded from four half days to five, so with that change came some new activities. One of them was the addition of Genius Hour (more on that in a subsequent post) where we encouraged campers to explore an application of coding that interested them. One of the more popular selections was the new Osmo Coding Jam.

Osmo is an attachment for your iPad that allows a child to play with Osmo toys in front of the iPad and interact with the Osmo apps on the iPad. There are nine different apps, with more on the way, that target everything from language arts to math to art. Read more of my thoughts on Osmo here. In a post a year ago, I highlighted Osmo's Coding app. This spring Osmo released Coding Jam, an app that creates music by arranging coding blocks.

I tested out the app before camp. Though the app is very intuitive, users begin with a tutorial mode that asks for certain combinations of the coding blocks to create certain sounds. This is especially helpful for students who are new to coding or new to Osmo. Through this process, a player learns where the blocks have to be placed and how to click them together and turn arrows to create the drag-n-drop style code that is similar to Scratch. As users work through levels of coding challenges, they earn new characters who play different sounds.


In addition to this step-by-step walkthrough, a studio mode allows free play and creation of masterpieces. Here coders can choose characters (and their unique sounds) and use the coding blacks to program a melody. They repeat this process until three character musicians combine their talents to play a collaborative tune. This studio mode is where Coding Jam really surpasses the capability of the original Coding app. The studio mode encourages application of coding steps while simultaneously valuing creation and musicianship. With interesting programmed chord progressions like those from Pachelbel's Canon or a typical blues sequence, kids will make beautiful music where they can change and incorporate many elements. My children, ages 11 and 13, both preferred the studio mode because they were very familiar with the Osmo and Coding apps and wanted to be left alone to create.

Last week at Coding Camp, Osmo Coding Jam was an option for all campers at the end of our sessions. Once a child sat down and started creating, we often had to almost drag them away from the station for parent pick-up. Osmo seems to specialize in engaging, intelligent toys and apps; Osmo Coding Jam definitely lives up to its brand. Check it out for your small coders!

Tuesday, June 27, 2017

Are you #NOTATISTE, too?

This week you can't swing a dead cat without hitting 5 or 10 tweets about ISTE17. I've never been, and I'm sure it's awesome (or is it?), but I have participated a couple of times in the #NOTATISTE Community on Google Plus. The community was started in 2013 by Dennis Grice, but this year is hosted by Peggy George, Vicky Sedgwick, and Jennifer Wagner.

In the #NOTATISTE Community, there are resources to make your own badge, connect with others, attack daily challenges, and win door prizes. In short, lots of great sharing like there is at ISTE without delayed flights and overpriced hotel rooms. Today's daily challenge was to post about someone you follow (Here's looking at you, Eric Curts!). The community of G+ has almost 2000 members (wow!) and you can meet some of them here.

I like the atmosphere and the sharing on Google Plus, but I really like the communities. Anyone can start a community about any topic. I belong to a bunch of them (Google, iPads, Apple, Science Specialists, Math Specialists, Coaches, Makers, STEM), some more active than others. Communities are a great place to connect with like-minded educators. If you have never joined one or checked one out, this is a great opportunity to do so. You might even win a door prize! Come learn with us!

Friday, June 23, 2017

Recap Journeys

In one of my most popular posts, I compared some key features of Recap and Flipgrid, two great tools that use video to capture student thinking. Last week I had the great fortune to talk a bit with Brian Lamb, co-founder of Recap, about some of the innovative things happening at Recap. The one that I was most excited to learn about are Recap Journeys.

The foundation of Recap Journeys is student curiosity. Pose a problem. Show a scenario. Do a demo. What do students notice? What do students wonder? Use the questions of the students to drive the learning of the lesson. The Recap Journey begins with a 60-second video that quickly introduces a topic. Students can use Recap to share their noticing and wondering, their predictions and estimations, their ideas and hypotheses. When building a Journey, teachers can curate a small set of resources that students can use to explore the topic. The student ideas can then become the focus of the lesson.

As a long time lover of scientific inquiry and a new admirer of modeling instruction, this focus on curiosity at Recap has captured my interest. When I introduce a new topic, I sometimes show a quick demo to get students thinking about what we will learn. That could become a Journey. Using Recap Journeys, I can easily adapt many of the inquiry labs I already do to collect student thinking along the way. Love three-act math tasks? Those are made for Recap Journeys. If you like the approach of modeling instruction, that aligns perfectly with what a Journey will accomplish.

What makes Recap Journeys so perfect is how they combine several hot button topics. Technology can be integrated in ways that heighten learning or squander that opportunity. Recap has created a great tool; now they are modeling ways that it can maximize engagement and learning. Much has been written about how traditional school can drum the creativity right out of a student. Along come Recap Journeys to shine the light back on curiosity. We know that students learn more when they are engaged; the focus on student-driven questions will increase engagement.

To help teachers get started with Recap Journeys, Recap has created Discover, a platform for sharing great Journeys so that we don't all have to start from scratch. Discover is searchable by subject and grade-level. Teachers can submit Journeys to Discover with some incentives in place to reward hard work. The vision is for Discover to become a YouTube-like resource, entirely focused on student curiosity.

Thursday, June 22, 2017

6 Highlights of my Apple Teacher Training

Last week I posted to my blog that I achieved the Apple Teacher designation and that I picked up a number of handy tips during the process even though I had been using iPads in my classroom for over five years. Here I share my favorite things I learned:


1. Slide Over


OK, in fairness, this one was not really new to me. I learned about Slide Over, the ability to slide over a multi-tasking work panel while in an app (two apps open at once), last year. I admit, though, that I haven't used it much at all. During the Apple Teacher work, I often worked in one app and used the slide over panel to read directions for the projects. Now that I have done that so much, it's becoming part of my work process. I can be browsing with Safari and adding things to my calendar or responding to text messages without closing an app. It feels more productive!


2. Markup Photos


I can't believe that I didn't know that there were markup tools native to the Photos app. Click the Edit icon and then the More icon. Click Markup. You can write on photos, add text, magnify a bit of the photo, draw shapes that will autocorrect to make straight lines. I love it!


3. Interactive Charts


Within the iWork Suite, you can create interactive data charts. When you use data to create a chart, in Pages or Keynote for example, you can choose a 2D or 3D chart like in other programs. You can also now click interactive charts to insert a chart with sliders that you can move and watch data change. It's very slick! Check out this great YouTube video to see more about it from the people at lynda.com.


4. Keynote Live


You can use Keynote Live to play a presentation over the internet so viewers can see it beyond the room where you are presenting. This concept isn't new to me. I use Nearpod for this all the time. Still, I didn't know you can do it with Keynote and just a few clicks. Presentations can be "joined" with or without a password by 35 people on a local wi-fi network or 100 people around the globe. How cool is that?!


5. Magic Move


And speaking of Keynote, there is a really fun animation feature called Magic Move that allows you to animate an object to move from one position to another during a slide transition. Here is an example I made in fewer than five minutes:


A quick aside: Keynote also just added hundreds of beautifully drawn shapes. I used two of those in the video above.

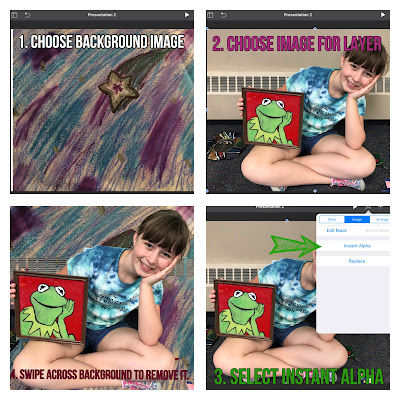
6. Instant Alpha


Like Slide Over, I think I knew about this one, but haven't used it. Instant Alpha allows you to remove parts of an image by simply dragging a finger across the image. In the example at the right, I used a piece of artwork my daughter created as a background image. Then I took a photo of her with other artwork and used Instant Alpha to remove most of the background so that I could layer her on top of her artwork. Instant Alpha can be used in Keynote and Pages! 

These are just the best 6 things I learned on my way to Apple Teacher. Maybe some of them are new to you, too!

Tuesday, June 13, 2017

An Apple for the Teacher


Last September I signed up for Apple Teacher. Apple Teacher is a free professional development program that offers educators an opportunity for self-paced PD and recognition for what they know and are able to do on an iPad or a Mac. 
It was my goal to earn this distinction by the end of the school year, but I didn't quite make it (until this past week!). One of the reasons that I kept back-burnering this was that I didn't know exactly what to expect. In case, you're in that same boat, let me give you some details.

By earning eight badges, a teacher earns the distinction of Apple Teacher. There are three tracks: iPad, Mac and Swift Playgrounds. The badges are

iPad:  iPad, Pages, Numbers, Keynote, Garage Band, iMovie, Productivity, & Creativity

Mac:  Mac, Pages, Numbers, Keynote, Garage Band, iMovie, Productivity, & Creativity

Swift: Swift Playground App, Coding Concepts, Swift Code, Coding in the Classroom

Once a teacher is signed up, she gains access to the Apple Teacher Learning Center where resources have been collected to help earn the Apple Teacher recognition. The most valuable resources in the collection were the iBook interactive guides. Each guide takes the user through a project using a particular tool. By the time you finish the project, you have learned the key features of the tool. Because I have been a active iPad user for six years, I didn't need to complete several of the projects, but I still read through the guides and learned several new features. I have very little experience with GarageBand or iMovie, so those projects really helped me understand the important elements of those tools. I am inspired to use iMovie more this year!

After you have mastered material, you take a five question quiz. You have to answer four of the five questions correctly to earn the badge. If you don't answer four questions correctly (Grrr, GarageBand), you can take another shot. The quizzes are not timed and you can easily refer to notes while you take them. A couple of times I opened up an app and fiddled around with it for minute to be sure I knew an answer.

The amount of time you spend on this will depend on your proficiency with the content. I spent about 20 minutes reading guides for apps where I felt very confident, but for the apps that were relatively new to me, I spent 45 minutes or so. The quizzes all take 5-10 minutes. I am also a Google Educator and Trainer; those modules and tests were much more difficult and stressful than these Apple Teacher training tools.

So why bother to become an Apple Teacher?
Most of what I know about iPads is what I learned on-the-fly. I appreciated the opportunity to work through some formal lessons at my own pace, discover some tips and tricks that will make me more productive, and explore a couple of apps I have rarely used. If your school is adopting Macs or iPads, I would recommend everyone work through these lessons. The modules emphasize the value of applying the tools to maximize learning! They are fast and fun essentials that will boost skills very quickly. The Apple Teacher credential verifies those skills.