Wednesday, January 28, 2015

Drawing on the Gas Laws

I recently wrote about a quiz question that asked students to solve limiting reactant problem that depended on a picture, including they needed to draw their solution.  Most of my students had mastered the math and sailed through the calculation part of my quiz but then struggled with the drawing task.  We have moved on now to gas laws, so, when it was again quiz time, I included another drawing item.  This time used a box of dots to represent the particles in a sample of gas.  I asked students to draw me a picture that would represent the particles in a sample with twice as much pressure.  I was checking to see if they understood the model and also if they understood the relationship between gas pressure and the other properties of volume, temperature and number of particles.  


Here are some sample student responses:

These two are essentially the same, but I like them both for different reasons.  The first with its solid demonstration of the model and the math, the second with its lovely conceptual simplicity.
This one is interesting.  The right idea, but I am looking forward to talking about how half the volume - which this student clearly knows is a good answer - and this picture are not the same.  Actually, a lot of students drew this same picture.


These two show the misconception that pressure and volume are the same.  Or that gases don't really fill an entire container like we know they do.  Good to know this misconception is still in the room.

Changing volume and number of particles were the most popular answers, but some kids addressed temperature nicely too.

Overall, the students did much better on this task.  I liked the open-ended nature of this one.  With at least three different answers, students had many opportunities to demonstrate mastery.  I awarded full credit for any picture that would show an increase in pressure; I didn't hold them strictly to double the pressure since I was really checking for the conceptual relationship more than the mathematical one.  The misconception uncovered here seems to be one that several students hold, so I hope it will be easy to dispel.  In another week or so we tackle gas stoichiometry, so I am already thinking about the drawing question I put on that quiz to see if we make improvements over the limiting reactant question.  Hopefully this confidence-building question will rub off on that one!

Tuesday, January 27, 2015

The Great Squid Challenge

One of the things I love about gas laws is the possibility for inquiry labs.  I start with the conceptual understanding of the relationships between gas pressure, volume, temperature and number of gas particles.  Kids can usually predict the relationships between any two of these four properties; I use this PheT simulation to help them see these relationships after they make predictions.  Then we are ready for a lab.

Students bring a plastic bottle to class on the day of lab.  I save bottles at my house and dig through the school trash and recycling bins for kids who forget.  The Great Squid Challenge has two parts.  First students must use a kit to create a working cartesian diver.  I show them a sample, but give them no extra instructions.  I tell them that instead I will give them the pleasure of figuring it out.  Once everyone in the lab group has a working squid, they have a slightly harder task.  Given a bottle and 5 numbered and weighted dropper bulbs, the students must make the droppers fall to the bottom of the bottle in numerical order.

It's great fun to watch the students tackle these two jobs.  They begin with doubt about how they will create the squid.  Some quickly assemble the parts but squeeze with all their might and still can't get the squid to dive.  Then they have to tinker until they get it right.  Eventually, the pieces all fall into place because once they get the five numbered droppers, they usually achieve that task fairly quickly.

In this picture at the left, you can see this group is systematically filling the droppers and laying them on the table before they test them in the bottle.  Many groups cheer and high-five when they succeed.  Only one group out of 30 did not finish during class this year.  

The day after this lab, I ask them to explain how the squid works on a quiz.  The students have to tell me which gas properties are constant, which properties change, and which gas law can be used to explain the experiment.  Most students did an excellent job at explaining this, demonstrating a solid understanding of the concept.

We buy our squid kits from Steve Spangler Science.  They also sell a kit where one squid hooks a second one. I have never tried that one, but it looks like big fun.  I bought some brass hardware and plastic droppers to make the numbered dropper sets that I reuse every year.

When I compare this to other gas law labs - like the one where you stack books on top of a syringe to increase pressure and measure volume - the payoff here is much greater.  Students really like this experiment.  The risk is low because the materials are very safe and the success rate is very high.  The materials are not very expensive.  Best of all, students understand and can explain the concept the next day, so they are still applying the relationship between two gas properties and the law that defines it.

Wednesday, January 21, 2015

The Best Place to Find PD and Community

 When I wrote my nominations for the 2014 edublog awards, I knew my choice for Most Influential Blog Post would be a piece by Audrey Watters.  I read her blogs with intense interest.  She has a point-of-view that is not duplicated anywhere else I have seen on the web and she writes with cynicism tempered by hope.  My favorite combination.  I nominated this post, but I mentioned it could have been any number of other posts she crafted last year.  Then, just about the time the awards were announced, she published this one, a post that questions whether or not Twitter is the best option for online professional development, something I have been asking myself and others for years.  Instead of elaborating on my opinions here, especially since she did it so succinctly in her post, I'd like to focus on her conclusion:
I’d wager the best place to find both remain on educators' blogs. I wonder if, in fact, "the future of professional development" might be a "return to blogging."
Though I am new to blogging, I have been regularly reading tremendous blogs for almost five years.  Every day someone asks me where I learn about all the things I have tried, how I keep up with our changing profession.  I follow 40 or 50 blogs, on education, edtech, and a number of other subjects, using feedly.  Feedly is an RSS aggregator - usually I get about that far in a description to a colleague or group when the huh?s start.  I like feedly a lot, but there are lots of ways to follow blogs.  For people who are just getting started and want a simple, clean platform for following blogs they like, I recommend bloglovin'.  It has the tiled, familiar look of Pinterest and is very easy and intuitive to get started.  Looking for some great blogs to check out and follow?  Try starting with Edtech magazine's Honor Roll of IT blogs.  There are many great ones listed, including Watters' Hack Education.  Looking to start blogging or start your students blogging?  Check out these resources from the Goodwill Community Foundation.  With just a few clicks, you will be on your way! 

I wholeheartedly agree that educator blogs are the best place to find community and professional development.  Meaningful professional development is always going to take more than 140 characters.  When I am looking for a new idea, the right tool for the job, or education rejuvenation, I will always "return to blogging."

Monday, January 19, 2015

The Rest of the Limiting Reactant Story

 
In December my classes wrapped our study of reactions and stoichiometry with a test just before our winter vacation.  I didn't have enough time to get to limiting reactant problems, so that was first on the agenda when we returned in January.  Coincidentally, that same week our school re-opened our learning center which had been re-imagined during first semester and transformed into The Hub, part library/part collaboratory.  I took advantage of the intersection of those situations to change up my treatment of limiting reactants.  My process prior to this year had been standard: start with a hands-on activity to introduce the concept, lecture on how to solve problems, practice in the lab the next day, quiz on day 3.  

Here is what I did this year:


Day 1:  Students met me in a campfire mediascape classroom in The Hub.  I passed out iPads and introduced the app StoichSim.  This simple but powerful app shows mass relationships in reactions by representing masses as bars that increase or decrease in size as the reactants are used and the products are formed.  I gave the students a set of questions to think about while they used the app and gave them some group work time.  Then we reconvened as a big group.  I used Reflector by Air Squirrels to mirror 4 iPads onto the TV in the mediascape so students could see the answers to all the questions for four reactions at a time.  That way they could see that the answers to their discussion questions were the same no matter which reaction they considered.

Day 2:  Students met me in the Learn Lab in The Hub.  This classroom features 4 tables, each with computers and the ability to mirror to the TV at the table's end.  After a brief intro, students were grouped for problem solving with a notes page and access to screencasts that show how to solve limiting reactant problems.  As a group, they could decide if they wanted to solve first and watch the screencast as a double-check or watch the screencast and take notes as we had traditionally or something in between.  Students, as a group, could choose the method they liked best.  I circulated to answer questions and provide help.  It was interesting to me that in one class everyone immediately turned on the screencast, but in the class right after that one, not one group began with the screencast.  They had two practice problems to try for homework.


Day 3:  Students completed one of the limiting reactant labs that I have used in past years.  Students dissolve two compounds in water and mix them, forming a precipitate.  They filter to isolate it and let it dry overnight.  They completed one more homework problem that night.

Day 4:  They took the quiz and finished the lab.  I wrote about my quiz here.  It included a standard limiting reactant question and a question that asked students to draw pictures to represent a limiting reactant problem.


So how did it go?


The data:  I finished grading the lab and the quiz this weekend.  My students averaged an 89% on the lab (2% higher than last year) and 87% on the quiz (3% lower than last year).  Some anecdotal observations:  Several students told me that they went back and watched the screencasts several times, so making those helped students who wanted extra help.  I asked one of my best students what he thought of learning this content.  He told me that he thought it went fine, but he still likes it best when I lead the class as a whole. 

There were some mitigating factors.  First, three snow days wrapped around a weekend.  And they occurred between Day 2 and Day 3, so some content was more than likely lost between the day they first solved problems and the day they took the quiz.  And I was absent on quiz day, so some students may have had questions that they didn't get answered.  And we were in The Hub on the first day it opened, in a classroom with glass walls.  My students did a great job paying attention despite the fact that they felt they were in a fishbowl, but the distractions may have detracted from the lessons.

Overall, I don't really know if this was better or worse than what I have done before.  The results seem about the same, but it was fun to try something a little different.  I really enjoyed teaching in these unusual spaces.  The change of scenery and furniture helped me imagine the lessons in a different way.  It was nice to step out of my cramped classroom and a little bit out of my comfort zone.  Stay tuned for more of the story as it unfolds this year.

Saturday, January 17, 2015

A Picture's Worth A Thousand Words


A few years ago my PLC made it our goal to help students understand chemistry at the particle level.  To that end, we designed at least one assessment item per unit that asked students to draw pictures of particles or interpret pictures of particles.  At first glance, this looks easy, but we were surprised at how much we learned about what our students didn't understand about the language of chemistry.  Years later, I remain intrigued at how telling these questions can be.

This week we have been working on limiting reactant problems.  My students took a test over reactions and stoichiometry (the math of chemical reactions that can predict how much of a reactant is needed to make a certain amount of product) just before our semester ended in December.  I ran out of days to squeeze in limiting reactant problems, so that was first on the docket when we returned in January.  I'll write more on how this went in a subsequent post.

In the meantime, please consider one of the questions from the quiz my students took this week, a question developed by my PLC years ago.  I was absent when they took it and my substitute told me that my students told me that they had no idea what they were doing, so I was anxious to see if their quizzes said that too!  The front side of the quiz is a limiting reactant math problem with results pretty much what I would expect:  Several students aced the math, most had the right idea but got stuck in a few places, a couple were entirely lost.  The food for thought, though, was on the reverse side in the particle question.

 
I like this question because it asks them to draw on a lot of chemistry knowledge.  They have to understand the difference between what a subscript tells them and what a coefficient tells them.  They have to interpret a chemical equation like a recipe.  They have to have a conceptual understanding of limiting reactants.  They have to demonstrate the law of conservation of mass.  On the reactions and stoichiometry test in December, students did well.  I know they can balance an equation, explain conservation of mass, and solve stoichiometry problems.  But, I think you'll agree that these papers show a disconnect between the mathematical interpretation of chemistry and the conceptual interpretation of chemistry.

Several students are confusing subscripts and coefficients.  Most of these students agree on which substance is limiting and which is in excess, even though they have all drawn different pictures and have different numbers of molecules.  Two of these papers violate the conservation of mass law.  One student is confused about which substance is hydrogen and which is nitrogen.  I also have noted that some students crossed out particles as they "used them up," some created a key for themselves, others wrote themselves notes for later.  I am not going to say which one is the correct answer.  If you are a chemistry teacher, or have a science background, you know which one is correct.  Each one shines a little light on a different misconception.  And an opportunity to clear one up. 

There are some ways I would improve the question.  And some things that I might do differently before I use it again.  I was fairly generous as I graded it.  I don't like to take away points for the same mistake twice, so if the picture was wrong, but the numbers matched the picture, I only took off for the picture.  Many of the students whose work is displayed here scored very well on the quiz, despite the misconceptions uncovered on this question.  That brings up the question for me: does the grade really reflect what they know and are able to do?  Does the weight of this question vs the mathematical portion reflect what I think is important to emphasize? 

If you are a chemistry teacher, I would love it if you would use this item or a similar item and share your results or your thoughts.


Friday, January 2, 2015

Reflections on Reflector by AirSquirrels

This post is going to be like the House that Jack built.  It's good to start with that.

Last summer my school won a big grant to increase our blended learning opportunities.  As part of this, our library has been re-imagined into an amazing collaborative learning space.  The library has been under construction for the first semester of the year, but today there was a staff open house so we could start to plan for how to use it.  There are so many beautiful new learning spaces.  I can't wait to try them all out, especially because 60 classrooms, including mine, are also getting a facelift, so many of our classrooms will look like these new spaces next fall.

My plan is to use one of the collaborative learning spaces on Monday.  My students will be discovering some mass relationships in chemical reactions.  I love the iPad app StoichSim for this.  It uses bars to represent masses of compounds involved in a reaction.  The bars change size to represent the decrease in mass of reactants and increase in mass of products during a reaction.  My plan is to have students play around with the app to answer questions like "Is the smallest mass always the limiting reactant?" or "How do the mass of the products depend on the mass of the reactants?"  Then I'll have the students mirror their iPads to the giant TV mediascape so they can use them to explain their discoveries.

But today, when I saw the mediascape, it turns out that the computers can project to the TV but iPads cannot.  I initially gave up the idea of mirroring the iPads, but, as the open house went on, I started thinking about how I must know a way to mirror the iPad to a laptop so I could project it to the TV.  A quick Google search when I got home reminded me of what I did know, on some level anyway.

Reflector by AirSquirrels.  I met these local guys when I presented at SPARCC this summer.  I was really impressed by their pitch and their products.  For $12.99 I downloaded the software to my MacBook and now I can mirror a mobile device to my MacBook.   Many times I read about apps that claim to be easy, but this one really was.  Open the app, open AirPlay on my iPad, and it reflects on the MacBook.  Very cool!

So if I can mirror the device to my MacBook, I can also screencast what I am doing on my iPad.  Or present off my iPad at conferences.  Or in my classroom.  Without an AppleTV.  Without all the dongles.  Without all the hassle.  I knew that this software claimed it would do this, but I have tried AirServer a number of times with limited success, so I expected this would be equally disappointing.  This worked perfectly on the first try with no glitches.  Excellent! 

This is an app.  This is an app that teaches students about reactions.  This is an app that teaches students about reactions if you can mirror it to the mediascape.  This is the app that will teach students about reactions when you mirror it to the mediascape using Reflector by AirSquirrels.  Now I can't wait to try it on Monday.


Thursday, January 1, 2015

Stop Writing Resolutions and Try EduCanon

This week it seems as if you can't swing a [virtual] dead cat without bumping into someone's post about their New Year's resolutions.  Frankly, I can't imagine that most people are interested in what mine are, so I am not going to write about them here.  If one of your resolutions is to try to increase your use of digital tools, here is one that is worth a try:  Check out eduCanon to annotate videos for classroom use.

EduCanon allows teachers to select videos and virtually attach questions to specific times in the video.  Students can watch the video and, in certain places, it will stop and pose a question.  The student cannot move forward without answering the question.  Videos can be from YouTube, Vimeo, Shmoop, or TeacherTube, so there are many  videos to choose from.

Start by signing up for a free account.  Once you are logged in, the process is broken into three steps - Design the assignment, Assign it, and Monitor the progress of your students.  These options are clearly located at the top of the screen to make your work easy and intuitive.  

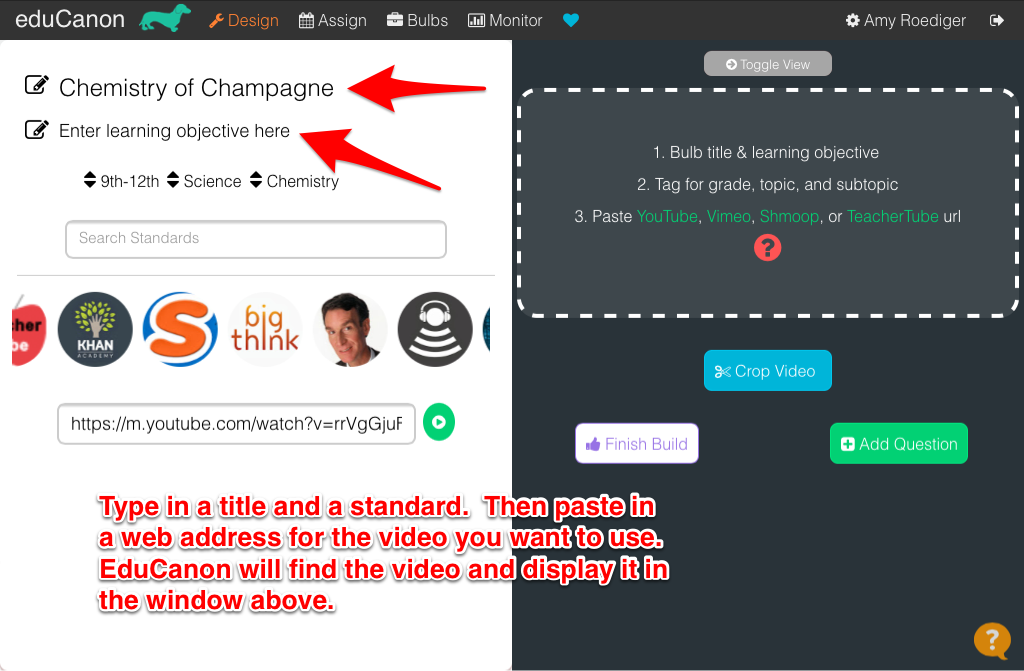
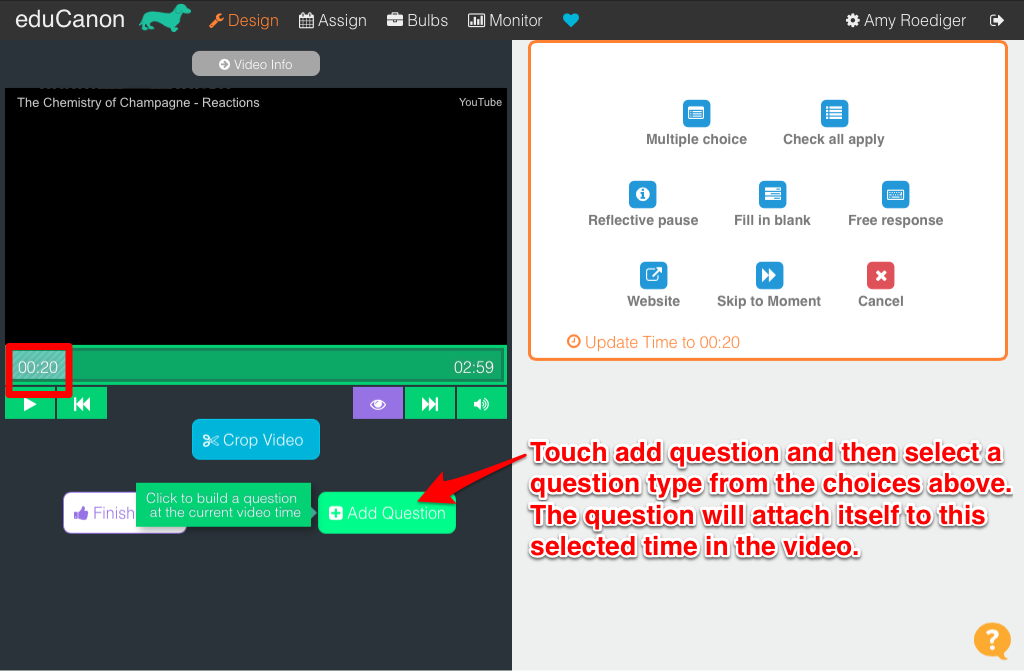
Design:  Click on Design to create an assignment (called a "bulb" by eduCanon).  Give your assignment a title and a standard.  I like that these assignments are tied to standards.  You can search for CCSS Math or ELA or NGSS for Science.  Next paste in the web address for the video you want to use and watch it load in a preview window.  Press play.  When you get to a place where you want to insert a question, click "Add Question."  Choose a question style and type it in.  You can even create feedback messages that will display when students get the answers right or wrong.  When you are all finished, click on "Finish Build."

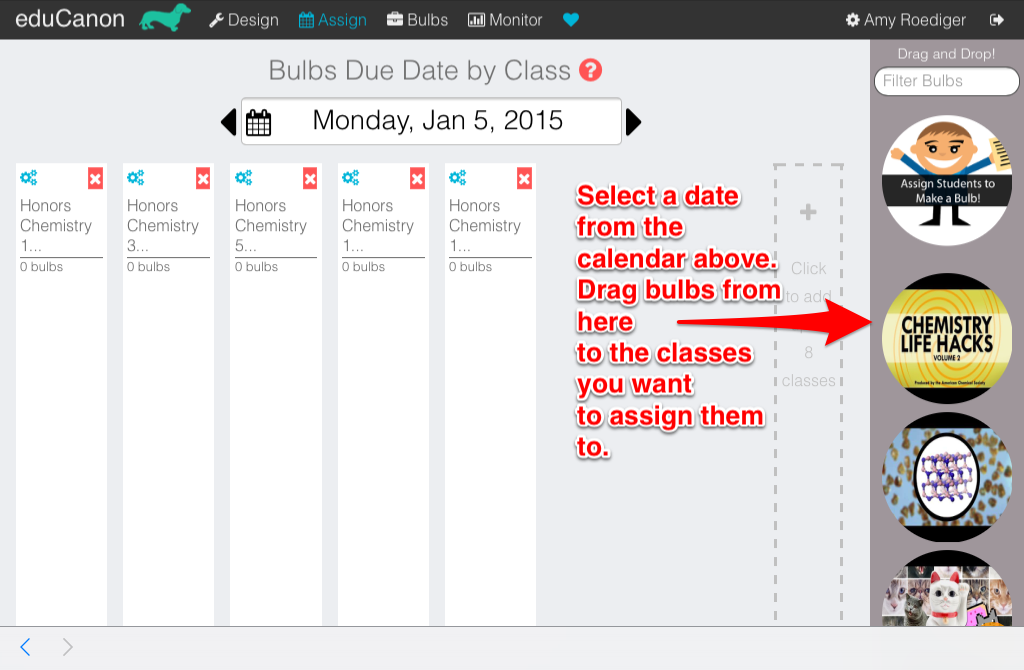
Assign:  Students can join a class with a join code that is provided to each teacher.  My students did this without me and we had no glitches.  When the teacher clicks Assign, she gets to a screen that shows each class on the left and each bulb or assignment on the right.  To assign the bulbs, select a date from the calendar and drag the bulbs to the classes.  It's so easy!

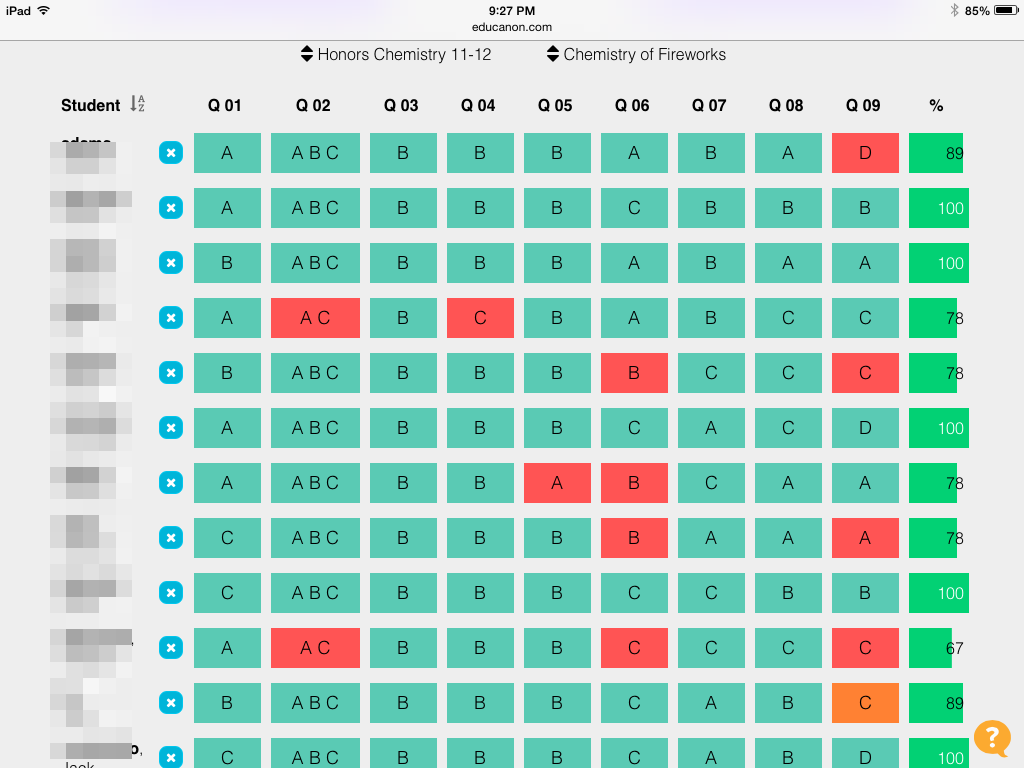
Monitor:  After students have completed assignments (or even if they haven't), you can monitor their progress by clicking on Monitor.  Then select a class and an assignment or bulb and you will see a grid that shows how each student answered every question, color-coded for right or wrong, and their percentage on the assignment.  

Like so many web services, eduCanon offers a free and a premium version.  The free service is pretty generous, but the premium version gives you more question types.  I received an email from eduCanon last week that suggested I could get all the premium question types if I filled out my account profile.  That seems like a great bargain!

Now, to your resolution.  This tool could be effectively used to flip a lesson or two.  Instead of merely watching something, teachers can provide checkpoints that provide formative feedback and a launch point for whatever happens after a lesson.  Another idea for eduCanon would be to use it for enrichment.  With so many excellent videos in the four video services, students could explore topics that might .  A third option that exists in eduCanon is for students to create their own bulb.  This could be very fun for students to use for a presentation or to demonstrate their knowledge about a subject.  

Many teachers are using videos in their classroom.  By also using eduCanon, we can give our students more digital experiences while easily collecting valuable data and providing some differentiated experiences.  And that will save time for doing other things on our resolution list in 2015.