Wednesday, December 30, 2015

Visualizing a Balanced Equation


If I was going to make a list of the 5 things I would want any student to be able to do when they leave high school chemistry, I would certainly include balancing equations on that list. A balanced equation is a chemical sentence, the shorthand way we have of representing what substances combine and what they change into. The equation has to be balanced (coefficients are placed in front of symbols and formulas) to show that the process obeys the Law of Conservation of Mass (all the atoms from the beginning of the process must still be around at the end). In December my students learned to balance equations and by the test before vacation, they had mastered it.

In an effort to make all this invisible chemistry more visual, I routinely ask my students to draw atoms and molecules using a model of different sized and colored circles to represent different types of atoms. Sometimes I provide the pictures and they interpret them; other times I provide the chemistry and they illustrate. On the test I gave before vacation, I asked them to draw the particles involved in this equation:

2 Al + 3 CuCl2 --> 2 AlCl3 + 3 Cu

Here are some of the responses:

What the student below drew would be Al2 + Cu3Cl6 --> Al2Cl6 + Cu3. The equation balances. All of the atoms from the reactants are still present as products. The coefficients and subscripts are confused, though, showing a lack of understanding of what those numbers represent. I love that the student included a key!


What this next student drew would be represented as Al2 + Cu3Cl2 --> Al2Cl3 + Cu3. Again there is confusion between coefficients and subscripts, but, in addition, this answer shows a lack of understanding that the coefficient applies to everything in a formula that follows it. 3 CuCl2 would not be molecules made of 3 copper (Cu) atoms and 2 chlorine (Cl) atoms. Also mass is not conserved here; there are 7 reactant atoms but 8 product atoms.


Most of the students drew something that looked like this next picture (or the one at the top of this post). This is the correct representation.


At the beginning of this year, I wrote about a new take on notetaking (my most popular post ever) and my experiments with sketchnoting. This visualizing chemistry is sort of an outgrowth of that and some other things I have tried over the years. Most of my students could balance the above equation in fewer than 30 seconds, but some of them, despite showing the ability to balance cannot correctly interpret what the equation means. And that is something I would never have known except that I asked them to draw it.

If you are teaching chemistry, asking your students to draw some things might reveal some misconceptions too. If you are not teaching chemistry, what could you ask your students to draw to check for understanding?

Tuesday, December 29, 2015

Nature at its Finest

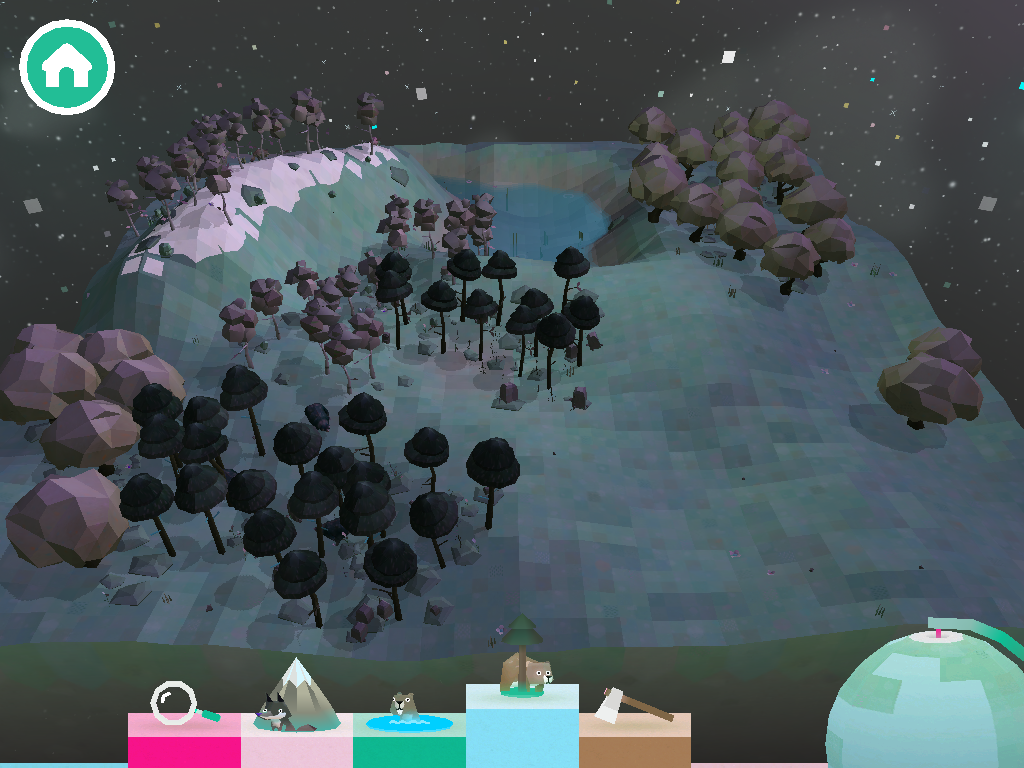
I recently spent more time, in a busy holiday season, than I care to admit playing with an app called Toca Nature. Toca Nature is one of 29 apps designed by TocaBoca, one of my favorite app makers. I think I grabbed it when it was free for 24 hours earlier this month and the cute fox icon was calling my name on Sunday morning when I should have been doing almost anything else. After just a few minutes, I was hooked.

Open the app and you find an almost blank canvas. There is a square landscape and some trees to get you started. Like all of TocaBoca's apps, the graphics are great. They have just the right mix of realism and fantasy, if that makes any sense. With some simple controls, you can add trees of 5 varieties or add mountains or water. Or, if you're that kind of person, use the hatchet to chop things down. With the trees come some animals. The animals need to eat, so you collect food too. Use a magnifier to zoom in and see the animals up close. If it sounds lovely, it is. If it sounds lame, just try it. I think you'll get hooked.


I like a lot of things about this app. First, it gives kids - even very small kids - an inkling about ecosystems. If you chop down all the trees, the animals disappear. If there are no fish for the foxes to eat, they start to look pretty sad. It isn't grim; there isn't death and destruction. But as my son chopped down trees and the animals vanished, we all understood what was happening.  Second, it offers a chance for discovery learning in a way that can't really be replicated by children in the world. While TocaBoca makes the point that this app isn't a substitute for actual nature, it is also really cool that you can make these big changes - create a forest, grow mountain range - and see what happens. Also, there are five animals that come with the 5 types of trees, but others are also possible and you have to figure out how to bring them around. Part of what had me hooked was trying to figure out how to "make" a wolf. Third, the animals adapt. Put a fox or a bear in the snowy mountains and see what happens. It's awesome. Finally, the simplicity of the controls and the groovy graphics really draw the player in and make it an engaging experience.


I like a lot of things about TocaBoca too. I like that they make the point that their apps are designed for open-ended fun that isn't competitive or designed for a specific gender or includes in-app purchases. I like that they post information about the importance of learning through play, that they take the position that digital toys and physical toys can be played in concert with one another, that balance is important. And I like that they are designing interesting apps that respect kids and offer them, in many cases, an experience that would be difficult to have in everyday life. Until Nature, my favorite TocaBoca app was TocaBuilders, a very cool maker-style app that I have called Minecraft without zombies, but the next one I want to try is TocaBlocks. It looks awesome too.

If you just bought an iPad for your family or your child, check out the suite of apps by TocaBoca and put Toca Nature on the top of your list.

Sunday, December 6, 2015

Create an Hour of Code this Week


This week is Computer Science Education Week. In conjunction with the week, and to encourage more people to try their hand at coding, Hadi Partovi and his army of friendly coders are encouraging us to create an Hour of Code. Two years ago this effort began and it grows every year. You don't need any experience to try your hand at some basic coding. The internet is crawling with easy activities and tutorials. In fact, Google's Made with Code has a fun Santa Tracker that is easy peazy. It won't take you an hour, but it might whet your appetite for more coding fun.


Two years ago I signed up to create an Hour of Code with my students. I blogged about it here. This year, like the previous two years, I will teach my students to write programs on their graphing calculators. I will lead them through one and let them create a second with only one requirement: the program must be used to solve a chemistry problem. I am always amazed at what they come up with. And how quickly they can do it after seeing just one program written.

If that sounds too high tech for you, try out one of these other resources:

  • Create stories, games, and animations with Scratch
There is something on this list for all ages, from about age 6 on. 

No one thinks that completing an Hour of Code with make someone an expert. But the idea that every student should have access to computer science education is a noble one. I have seen first hand in my classroom that, for some students, seeing that they can write a program is transformative. Spark someone's imagination this week by helping them create an Hour of Code. You'll be glad you did. And so will they.

Monday, November 30, 2015

Quiver with Excitement

Over a year ago, I wrote a post about a couple of things, including some augmented reality apps that I like. I also added an augmented reality page to my blog so I can stockpile resources for using AR in the classroom. One of the apps you will find in both places used to be called ColAR Mix. In the year since the post, the app has been renamed as Quiver. It remains one of my favorite AR apps to show people. Imagine my excitement to learn that they now also have a Quiver Education app.

Like the original ColAR Mix, er . . . Quiver, the app offers coloring pages that you can download online. The app brings them to life with the augmented reality experience and the objects dance around on the mobile device screen decorated in the way the artist colored them. My children, including my reluctant to color 12 year old, were happy to oblige me when I suggested we try out this new app. 

We tried out several pages - the world map, a create your own flag, a tetrahedron, the volcano, and the animal cell. The world map can be brought to life with or without border lines (shown here with border lines). The Earth spins as the colored portions are displayed. The flag flies on a pole and can be raised or lowered. Both of these also allow the user to explore traditional images of Earth and flags. 


The tetrahedron is one of several available platonic solids that can be virtually thrown like dice. Each time you throw it, you could get a different side. That could be a fun way to choose something in a classroom! 

The volcano and the cell have the 3D experience that users love about Quiver but they also contain an added bonus, a quiz. You can view the image as you colored it, but you can also be quizzed on parts of the volcano or the cell. The app asks you to identify a feature and gives you a selection of choices to tap. If you tap the wrong one, it shows the correct one. It is a fun way to check on progress.


As with the Quiver app, I love the incentive of coloring the page when you get to see the image come to life. Even without the quiz, the animal cell is so great because you can see it in three dimensions. As a science teacher who struggles to help students see 2D images and envision them in three dimensions, I love this. Another feature I like is a drawer that pops out to reveal a camera and video icon to make for easy recording. This is much easier to use that to hold the device still over a sheet of paper and try to simultaneously tap the home and sleep/wake buttons!


No mention of an app would be complete without the price. Quiver Education might seem pricey at first glance: $7.99. That price, though, gets you all the coloring pages that will be available without in-app purchases and is eligible for the volume purchasing program. For an app of this quality with a promise of future content, that price is a deal.

Thanks to the friends at Quiver Education for gifting the app to me. I appreciate the chance to use it and tell people about its awesome potential.

Saturday, November 14, 2015

Measure Progress with Two Great Rubric Tools

Lately I have been on a bit of a rubric rampage. I love rubrics for a lot of reasons. I think they make grading subjective work a lot easier. And they simultaneously help students differentiate between performance levels and work to improve. I like how creating a rubric really helps me think deeply about what I am expecting my students to know and be able to do and how I will determine the degree to which they can do it. I use a rubric for scoring the group work that my students do in the lab and another rubric for grading lab reports.

This week I worked for many hours on a rubric that our instructional coaches and administrators introduced to our staff for self-analysis of our station rotations. It took a lot of hours and talking for us to arrive at a good starting point, but I know I learned a lot in the process. Today I taught some Google PD at Lake Erie College and, as part of that, I found and experimented with a rubric add-on. Then later I tweeted about a rubric tool that is easy and fast to use. As long as I am thinking so much about rubrics this week, I felt like I should dedicate a post to them.


Orange Slice: Teacher Rubric

During the PD I led today, I described add-ons and gave some time to explore. While I was exploring add-ons, Orange Slice caught my eye. A quick read of the description and reviews and I installed it. I tried it out and liked it a bunch. After it's installed, open a Google Doc and then run the add-on. If you have a ready-made rubric (like my lab report rubric) you can use it or Orange Slice helps you create one from scratch. Decide on some basic options (performance levels, grading categories), follow the prompts in the add-on pane and you will quickly have a rubric that pastes itself into the document. Keep working in the add-on pane and you will click your way toward grading the document. As you click, the rubric is highlighted to show the score in each level and a grade posts at the top of the page. Voilà! It's awesome!


A couple other thoughts on this one. First, use Chrome. I tried it in Firefox and it sort of worked. But only sort of. Second, there is a teacher add-on and a student add-on. I didn't try the student add-on, but this one is for peer edits. Many of my colleagues shun peer editing for a variety of reasons, but if you do it, maybe the student add-on would be helpful. It allows kids to score student work but then be overridden by the teacher score.


Quick Rubric

Storyboard That is a very cool and super-customizable tool that has an infinite number of uses in a classroom. The wizards behind Storyboard That have created two other equally cool tools, Photos for Class and Quick Rubric. There are so many things to like about Quick Rubric that it's hard to know where to start, but one of the things I found most impressive was the amount of resources about rubrics that are found on their site. The resources include an introductory article about rubrics, tips to making a great rubric, and ways to use advanced formatting in rubrics with this tool. How cool is that that help is provided, that this tool is instructionally based with a little PD support? Click the giant orange button that says Create a Rubric and you are on your way. You start with a 3x3 rubric but it is easy to add rows and columns and move things around. Type in performance levels or stick with theirs (beginning, emerging, proficient) and criteria for grading. Typie in how many points the assignment is worth and the tool assigns point values to categories. Create an account to save your rubric or access rubrics you create.


Maybe part of the reason why some teachers don't use rubrics is that they can be time-consuming to create and apply. With these two great tools, those excuses are gone!

Wednesday, November 11, 2015

Provide Better Feedback with The Answer Pad

I can't go to bed tonight until I write about all the great things happening with The Answer Pad. As a TAP Champion, I sometimes get to preview some features of this excellent tool before they go live for everyone. Today the features that I will describe have gone live for everyone, so please check them out. You will be glad you did!

If you have read some of my other posts, you will know that I love this tool. The Answer Pad is two great services - one part student response system, one part digital answer sheet maker. Want to just ask some questions in class and see how well the students understand the lesson? The Answer Pad can help with that. Want to stop spending time grading tests? The Answer Pad can help with that too. With generous free features and very affordable premium features, this tool is one of the best values out there. This week a great tool got even better.

The newest feature is a feedback loop. Send a screen out to your students for feedback. I sent out a blank canvas and asked students to draw a molecule. Once the answers start rolling in, the teacher can provide some feedback. Colored dots (lower left in the picture above) can be sent out to the students to show them if they mastered the task, came close, or need another attempt. If they need another attempt, you can unlock individual student's work (lower right in the picture above) and send it back for another attempt. I previewed these features in class last week and one of my students said, "This was fun. Can we do another one?" Awesome!

Earlier this fall I took advantage of a different set of updates that work so nicely with this feedback tool. When students sign in, their names appear under the blue block that will contain their answers. There are two checkboxes above the student work that can take the tool to a new level when the work is projected. Uncheck the Show Names box and the student work becomes anonymous. Then students can see the answers of their peers, making for a great discussion of which are great and which need work. 


Don't want students to create an answer based on what they see? No problem. Simply uncheck the Show Answers box. When a student submits an answer, the class sees a little blue spy. Once all the answers are in, click the box to reveal everyone's answers at once.
The Answer Pad is a very easy and intuitive tool that requires little preparation or technical know-how to use and get great data and results. It works on all web-enabled devices and there are iOS and android apps. This week the tool got even better. If you want to try out something new in your classroom tomorrow, check this one out today!

Wednesday, November 4, 2015

More Buried Treasure in Keynote!

Last month I wrote about how there are some secret tools in Keynote. That was a great find. Last week I found some more. 

One of the features of iOS 9 I was most excited about was the ability to use two apps at once. When you are in an app, swipe left from the right side of the screen and a drawer opens. These are apps you can open in addition to the one you started in. It turns out that there are some limitations. You can't open just any app, just certain ones. It looks to me like the ones you can open in this reel are just the ones that are native to the iPad. That's a good start, but I hope more will be added.


Now to the Keynote treasure part: When you are presenting in Keynote on your iPad and you slide open this drawer, it doesn't get projected! So I can have a slide up - maybe my students are copying some notes before we talk about them or they are solving a problem - and open these other apps so that I can use Safari to take attendance or use the timer to keep us all on schedule. The students see the slide but I can open the second app and keep it hidden.


I would love to see other apps added to this reel of apps so that I could open Teachers Pick to choose a random student to solve the problem or open Chartkeeper to track student progress or a million other things. The possibilities are endless!